About Tom Ryder

sysadmin, dev, writer, IRC nuisance. vi/vim/vimself

Vim character info

Vim will show you the decimal, octal, and hex index of the character under the cursor if you type ga in normal mode. Keying this on an ASCII a character yields the following in the status bar:

<a>  97,  Hex 61,  Octal 141

This information can be useful, but it’s worth it to extend it to include some other relevant information, including the Unicode point and name of the character, its HTML entity name (if applicable), and any digraph entry method. This can be done by installing the characterize plugin by Tim Pope.

With this plugin installed, pressing ga over a yields a bit more information:

<a> 97, \141, U+0061 LATIN SMALL LETTER A

This really shines however when inspecting characters that are available as HTML entities, or as Vim digraphs, particularly commonly used characters like an EM DASH:

<—> 8212, U+2014 EM DASH, ^K-M, &mdash;

Or a COPYRIGHT SYMBOL:

<©> 169, \251, U+00A9 COPYRIGHT SIGN, ^KCo, ^KcO, :copyright:, &copy;

Or as one of the eyes in a look of disapproval:

<ಠ> 3232, U+0CA0 KANNADA LETTER TTHA

Note that ga shows you all the Unicode information for the character, along with any methods to type it as a digraph, and an appropriate HTML entity if applicable.

If you work with multibyte characters a lot, whether for internationalization reasons or for typographical correctness in web pages, this may be very useful to you.

Zooming tmux panes

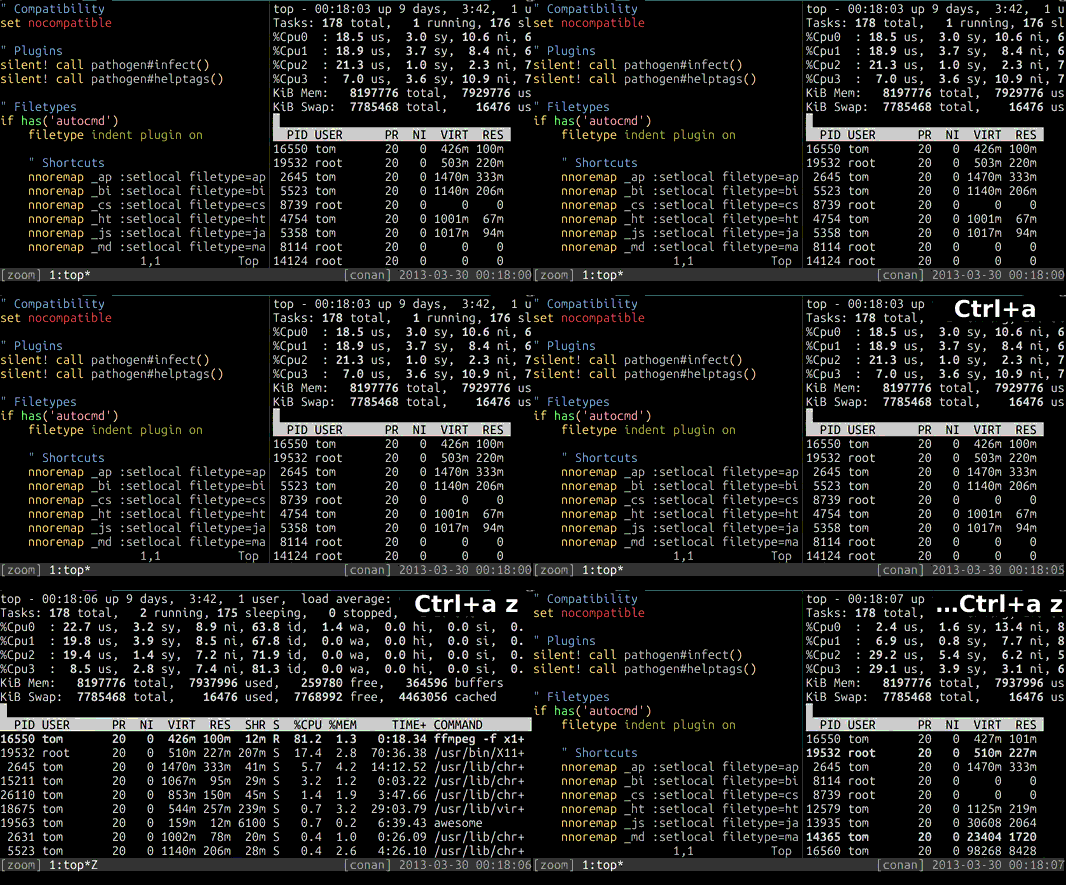
The recently released tmux 1.8 includes a new feature, zoomed panes, that allows temporarily expanding a pane to the full size of the tmux window to see more of its contents.

In the man page for tmux(1), the feature is described as follows, under the details for the resize-pane command:

With -Z, the active pane is toggled between zoomed (occupying the
whole of the window) and unzoomed (its normal position in the
layout).

This command is bound to <prefix> z by default; for most users, this will be Ctrl-a z. The effect can be observed by pressing this key sequence in any window with at least two panes, to toggle the zoomed state for the active pane:

Toggle pane zoom state

Note the Z suffix that appears after the window title in the status bar while the pane is zoomed.

For most users, the new feature should mean that any custom maximize/minimize style bindings they may be using are no longer needed. This works particularly smoothly given that the new release also includes support for reflowing text when panes and windows are resized, something GNU Screen has supported for some time.

Be sure to take a look at some of the other changes in the newest release of tmux. If you’re using a DPKG or RPM based packaging system, you might like to build it from source and install it with checkinstall(8).

RSS with Newsboat

The 2013 announcement that Google Reader would no longer be available prompted many of its users to look for alternative RSS reader applications. There are plenty of other web-based and GUI options, but text user interface enthusiasts (and Arabesque readers) may find Newsboat, formerly Newsbeuter, worth a look in particular.

Newsboat refers to itself as “the Mutt of RSS readers”, alluding to its keystroke-driven ncurses(3) interface, plaintext configuration with many options, and extensive feature set. If you like the idea of using a client-side RSS reader in a terminal, then this may be ideal for you.

Having a client-side reader is particularly valuable if you follow feeds which aren’t available on the public internet, or if you would prefer to keep your subscriptions relatively private. It’s also handy to have a local cache of feed items to search, which is a feature of Newsboat.

Installing Newsboat

Newsboat can be downloaded and built from source. At the time of writing (December 2017), it may not yet be available in your operating system’s package manager, though its unmaintained predecessor Newsbeuter may be.

Newsboat will throw an error if you try to start it with no feeds defined. We’ll be fixing that shortly.

Managing feeds

Adding, removing, and tagging feeds is all done with the urls file. This might be saved in either ~/.config/newsboat/urls, or ~/.newsboat/urls. Either way, you can edit it directly within the program using E, which will start your $EDITOR to manage the URLs. Add and remove feed URLs, save the file, quit, and you’re done; Newsboat will reload its defined feeds automatically once the editor is closed. The titles of your feeds will appear, along with a count of their unread items.

Some useful keystrokes

From here, the basics are pretty intuitive; you can move around with the cursor keys, and select feeds and items within them with Enter. You can press q to move up a screen, and to quit the program; Q will quit unconditionally from any screen.

You can move to next and previous feed items with J and K. A nice quick way to read everything is to cycle through unread items across all feeds with n. You can save the complete text of an article with s, and search for articles matching a string (not a regular expression) with /.

You can press o to open the feed’s URL in a browser; this works fine if you’re using an X server, but you can also configure this to be a command-line browser like lynx if you’d prefer with the browser option in the configuration file. If you’re using PuTTY and you’re going to be copy-pasting URLs from your terminal window, it helps to make sure you’ve configured it to easily select URLs on double-click.

A complete list of all the keystrokes is available by pressing ?.

Tags

If you imported your feeds from another system, and you were using folders to keep your feeds organised, you may note that in your urls file in Newsboat the names of the folders are included in quotes at the end of each line:

https://debian-administration.org/atom.xml "Tech"
https://www.jerkcity.com/jc.rss "Comics"
https://www.kiwiblog.co.nz/feed "Politics"

These are tags, Newsboat’s way of organising feeds non-hierarchically. If you have such tags defined, you can limit your view of feeds to a particular tag by pressing t to show only those matching feeds. You can press Ctrl-t to back out of that view and show all feeds again.

Creating a new tag is done by editing the urls file as above. Add the tag in quotes after the appropriate feed URLs. Note that you can have more than one tag for each URL:

https://www.debian-administration.org/atom.xml "Tech" "Debian"

Configuration

The Newsboat configuration file might be in either ~/.config/newsboat/config or ~/.newsboat/config. The following options might be useful:

  • auto-reload yes — Check all feeds for new items on startup, and periodically thereafter.
  • reload-time 30 — Re-check all feeds automatically every 30 minutes.
  • notify-beep yes — Send a console beep every time new items are found. You will probably only want this if you are dealing sensibly with bells, for example with a visual bell system in GNU Screen or tmux, otherwise you may find an audible bell annoying.
  • confirm-exit yes — Prompt before quitting. Tapping q to get to the top screen is a little error-prone, and it’s easy to quit accidentally.

The colorscheme for the application can also be customized here, and the keybindings too. See the Newsboat documentation for a complete list of configuration options.

Special feeds

If you can’t directly retrieve your feed from a URL, but need to generate it programatically from a script or use a tool like curl to retrieve it, you can use special exec: URLs in the urls file to manage this. For example, to retrieve an RSS feed of my work’s network changelist, I do something like this:

"exec:ssh work curl http://changelog.worknet/rss.xml"

This retrieves the feed using curl(1) over ssh(1), and presents it as a normal feed in Newsboat. Note the quotes are required for any command that includes spaces.

I’ve found Newsboat a great tool, and it fits very nicely as a permanent window in my tmux(1) session. Hopefully you’ll find it suits you too, and works well with your terminal-based workflow.

This post was edited in December 2017 to direct users to the maintained fork of the abandoned Newsbeuter software, and to put the demise of Google Reader firmly into the past tense, as the migration tools it offered temporarily are long-gone.

TERM strings

A certain piece of very misleading advice is often given online to users having problems with the way certain command-line applications are displaying in their terminals. This is to suggest that the user change the value of their TERM environment variable from within the shell, doing something like this:

$ TERM=xterm-256color

This misinformation sometimes extends to suggesting that users put the forced TERM change into their shell startup scripts. The reason this is such a bad idea is that it forces your shell to assume what your terminal is, and thereby disregards the initial terminal identity string sent by the emulator. This leads to a lot of confusion when one day you need to connect with a very different terminal emulator.

Accounting for differences

All terminal emulators are not created equal. Certainly, not all of them are xterm(1), although many other terminal emulators do a decent but not comprehensive job of copying it. The value of the TERM environment variable is used by the system running the shell to determine what the terminal connecting to it can and cannot do, what control codes to send to the program to use those features, and how the shell should understand the input of certain key codes, such as the Home and End keys. These things in particular are common causes of frustration for new users who turn out to be using a forced TERM string.

Instead, focus on these two guidelines for setting TERM:

  1. Avoid setting TERM from within the shell, especially in your startup scripts like .bashrc or .bash_profile. If that ever seems like the answer, then you are probably asking the wrong question! The terminal identification string should always be sent by the terminal emulator you are using; if you do need to change it, then change it in the settings for the emulator.

  2. Always use an appropriate TERM string that accurately describes what your choice of terminal emulator can and cannot display. Don’t make an rxvt(1) terminal identify itself as xterm; don’t make a linux console identify itself as vt100; and don’t make an xterm(1) compiled without 256 color support refer to itself as xterm-256color.

In particular, note that sometimes for compatibility reasons, the default terminal identification used by an emulator is given as something generic like xterm, when in fact a more accurate or comprehensive terminal identity file is more than likely available for your particular choice of terminal emulator with a little searching.

An example that surprises a lot of people is the availability of the putty terminal identity file, when the application defaults to presenting itself as an imperfect xterm(1) emulator.

Configuring your emulator’s string

Before you change your terminal string in its settings, check whether the default it uses is already the correct one, with one of these:

$ echo $TERM
$ tset -q

Most builds of rxvt(1), for example, should already use the correct TERM string by default, such as rxvt-unicode-256color for builds with 256 colors and Unicode support.

Where to configure which TERM string your terminal uses will vary depending on the application. For xterm(1), your .Xresources file should contain a definition like the below:

XTerm*termName: xterm-256color

For rxvt(1), the syntax is similar:

URxvt*termName: rxvt-unicode-256color

Other GTK and Qt emulators sometimes include the setting somewhere in their preferences. Look for mentions of xterm, a common fallback default.

For Windows PuTTY, it’s configurable under the ”’Connections > Data”’ section:

Setting the terminal string in PuTTY

More detail about configuring PuTTY for connecting to modern systems can be found in my article on configuring PuTTY.

Testing your TERM string

On GNU/Linux systems, an easy way to test the terminal capabilities (particularly effects like colors and reverse video) is using the msgcat(1) utility:

$ msgcat --color=test

This will output a large number of tests of various features to the terminal, so that you can check their appearance is what you expect.

Finding appropriate terminfo(5) definitions

On GNU/Linux systems, the capabilities and behavior of various terminal types is described using terminfo(5) files, usually installed as part of the ncurses package. These files are often installed in /lib/terminfo or /usr/share/terminfo, in subdirectories by first letter.

In order to use a particular TERM string, an appropriate file must exist in one of these directories. On Debian-derived systems, a large collection of terminal types can be installed to the system with the ncurses-term package.

For example, the following variants of the rxvt terminal emulator are all available:

$ cd /usr/share/terminfo/r
$ ls rxvt*
rxvt-16color  rxvt-256color  rxvt-88color  rxvt-color  rxvt-cygwin
rxvt-cygwin-native  rxvt+pcfkeys  rxvt-unicode-256color  rxvt-xpm 

Private and custom terminfo(5) files

If you connect to a system that doesn’t have a terminfo(5) definition to match the TERM definition for your particular terminal, you might get a message similar to this on login:

setterm: rxvt-unicode-256color: unknown terminal type
tput: unknown terminal "rxvt-unicode-256color"
$

If you’re not able to install the appropriate terminal definition system-wide, one technique is to use a private .terminfo directory in your home directory containing the definitions you need:

$ cd ~/.terminfo
$ find
.
./x
./x/xterm-256color
./x/xterm
./r
./r/rxvt-256color
./r/rxvt-unicode-256color
./r/rxvt
./s
./s/screen
./s/screen-256color
./p
./p/putty-256color
./p/putty

You can copy this to your home directory on the servers you manage with a tool like scp:

$ scp -r .terminfo server:

TERM and multiplexers

Terminal multiplexers like screen(1) and tmux(1) are special cases, and they cause perhaps the most confusion to people when inaccurate TERM strings are used. The tmux FAQ even opens by saying that most of the display problems reported by people are due to incorrect TERM settings, and a good portion of the codebase in both multiplexers is dedicated to negotiating the differences between terminal capacities.

This is because they are “terminals within terminals”, and provide their own functionality only within the bounds of what the outer terminal can do. In addition to this, they have their own type for terminals within them; both of them use screen and its variants, such as screen-256color.

It’s therefore very important to check that both the outer and inner definitions for TERM are correct. In .screenrc it usually suffices to use a line like the following:

term screen

Or in .tmux.conf:

set-option -g default-terminal screen

If the outer terminals you use consistently have 256 color capabilities, you may choose to use the screen-256color variant instead.

If you follow all of these guidelines, your terminal experience will be much smoother, as your terminal and your system will understand each other that much better. You may find that this fixes a lot of struggles with interactive tools like vim(1), for one thing, because if the application is able to divine things like the available color space directly from terminal information files, it saves you from having to include nasty hacks on the t_Co variable in your .vimrc.

PuTTY configuration

PuTTY is a terminal emulator with a free software license, including an SSH client. While it has cross-platform ports, it’s used most frequently on Windows systems, because they otherwise lack a built-in terminal emulator that interoperates well with Unix-style TTY systems.

While it’s very popular and useful, PuTTY’s defaults are quite old, and are chosen for compatibility reasons rather than to take advantage of all the features of a more complete terminal emulator. For new users, this is likely an advantage as it can avoid confusion, but more advanced users who need to use a Windows client to connect to a modern GNU/Linux system may find the defaults frustrating, particularly when connecting to a more capable and custom-configured server.

Here are a few of the problems with the default configuration:

  • It identifies itself as an xterm(1), when terminfo(5) definitions are available named putty and putty-256color, which more precisely define what the terminal can and cannot do, and their various custom escape sequences.
  • It only allows 16 colors, where most modern terminals are capable of using 256; this is partly tied into the terminal type definition.
  • It doesn’t use UTF-8 by default, which should be used whenever possible for reasons of interoperability and compatibility, and is well-supported by modern locale definitions on GNU/Linux.
  • It uses Courier New, a workable but rather harsh monospace font, which should be swapped out for something more modern if available.
  • It uses audible terminal bells, which tend to be annoying.
  • Its default palette based on xterm(1) is rather garish and harsh; softer colors are more pleasant to read.

All of these things are fixable.

Terminal type

Usually the most important thing in getting a terminal working smoothly is to make sure it identifies itself correctly to the machine to which it’s connecting, using an appropriate $TERM string. By default, PuTTY identifies itself as an xterm(1) terminal emulator, which most systems will support.

However, there’s a terminfo(5) definition for putty and putty-256color available as part of ncurses, and if you have it available on your system then you should use it, as it slightly more precisely describes the features available to PuTTY as a terminal emulator.

You can check that you have the appropriate terminfo(5) definition installed by looking in /usr/share/terminfo/p:

$ ls -1 /usr/share/terminfo/p/putty*
/usr/share/terminfo/p/putty  
/usr/share/terminfo/p/putty-256color  
/usr/share/terminfo/p/putty-sco  
/usr/share/terminfo/p/putty-vt100

On Debian and Ubuntu systems, these files can be installed with:

# apt-get install ncurses-term

If you can’t install the files via your system’s package manager, you can also keep a private repository of terminfo(5) files in your home directory, in a directory called .terminfo:

$ ls -1 $HOME/.terminfo/p
putty
putty-256color

Once you have this definition installed, you can instruct PuTTY to identify with that $TERM string in the Connection > Data section:

Correct terminal definition in PuTTY

Here, I’ve used putty-256color; if you don’t need or want a 256 color terminal you could just use putty.

Once connected, make sure that your $TERM string matches what you specified, and hasn’t been mangled by any of your shell or terminal configurations:

$ echo $TERM
putty-256color

Color space

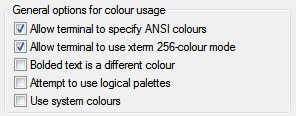
Certain command line applications like Vim and Tmux can take advantage of a full 256 colors in the terminal. If you’d like to use this, set PuTTY’s $TERM string to putty-256color as outlined above, and select Allow terminal to use xterm 256-colour mode in Window > Colours:

256 colours in PuTTY

You can test this is working by using a 256 color application, or by trying out the terminal colours directly in your shell using tput:

$ for ((color = 0; color <= 255; color++)); do
> tput setaf "$color"
> printf "test"
> done

If you see the word test in many different colors, then things are probably working. Type reset to fix your terminal after this:

$ reset

Using UTF-8

If you’re connecting to a modern GNU/Linux system, it’s likely that you’re using a UTF-8 locale. You can check which one by typing locale. In my case, I’m using the en_NZ locale with UTF-8 character encoding:

$ locale
LANG=en_NZ.UTF-8
LANGUAGE=en_NZ:en
LC_CTYPE="en_NZ.UTF-8"
LC_NUMERIC="en_NZ.UTF-8"
LC_TIME="en_NZ.UTF-8"
LC_COLLATE="en_NZ.UTF-8"
LC_MONETARY="en_NZ.UTF-8"
LC_MESSAGES="en_NZ.UTF-8"
LC_PAPER="en_NZ.UTF-8"
LC_NAME="en_NZ.UTF-8"
LC_ADDRESS="en_NZ.UTF-8"
LC_TELEPHONE="en_NZ.UTF-8"
LC_MEASUREMENT="en_NZ.UTF-8"
LC_IDENTIFICATION="en_NZ.UTF-8"
LC_ALL=

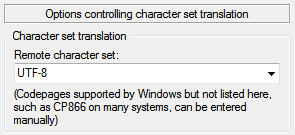
If the output of locale does show you’re using a UTF-8 character encoding, then you should configure PuTTY to interpret terminal output using that character set; it can’t detect it automatically (which isn’t PuTTY’s fault; it’s a known hard problem). You do this in the Window > Translation section:

Using UTF-8 encoding in PuTTY

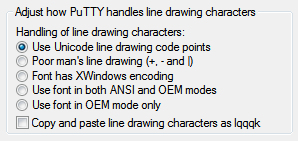
While you’re in this section, it’s best to choose the Use Unicode line drawing code points option as well. Line-drawing characters are most likely to work properly with this setting for UTF-8 locales and modern fonts:

Using Unicode line-drawing points in PuTTY

If Unicode and its various encodings is new to you, I highly recommend Joel Spolsky’s classic article about what programmers should know about both.

Fonts

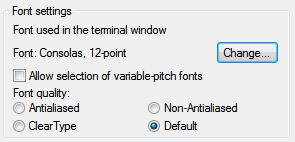
Courier New is a workable monospace font, but modern Windows systems include Consolas, a much nicer terminal font. You can change this in the Window > Appearance section:

Using Consolas font in PuTTY

There’s no reason you can’t use another favourite Bitmap or TrueType font instead once it’s installed on your system; DejaVu Sans Mono, Inconsolata, and Terminus are popular alternatives. I personally favor Ubuntu Mono.

Bells

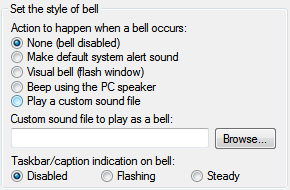
Terminal bells by default in PuTTY emit the system alert sound. Most people find this annoying; some sort of visual bell tends to be much better if you want to use the bell at all. Configure this in Terminal > Bell:

Using taskbar bell in PuTTY

Given the purpose of the alert is to draw attention to the window, I find that using a flashing taskbar icon works well; I use this to draw my attention to my prompt being displayed after a long task completes, or if someone mentions my name or directly messages me in irssi(1).

Another option is using the Visual bell (flash window) option, but I personally find this even worse than the audible bell.

Default palette

The default colours for PuTTY are rather like those used in xterm(1), and hence rather harsh, particularly if you’re used to the slightly more subdued colorscheme of terminal emulators like gnome-terminal(1), or have customized your palette to something like Solarized.

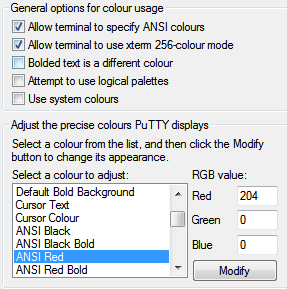
If you have decimal RGB values for the colours you’d prefer to use, you can enter those in the Window > Colours section, making sure that Use system colours and Attempt to use logical palettes are unchecked:

Defining colorschemes in PuTTY

There are a few other default annoyances in PuTTY, but the above are the ones that seem to annoy advanced users most frequently. Dag Wieers has a similar post with a few more defaults to fix.

Additional sshd ports

Occasionally you may find yourself using a network behind a firewall that doesn’t allow outgoing TCP connections with a destination port of 22, meaning you’re unable to connect to your OpenSSH server, perhaps to take advantage of a SOCKS proxy for encrypted and unfiltered web browsing.

Since these restricted networks almost always allow port 443 out, since it’s the destination port for outgoing HTTPS requests, an easy workaround is to have your OpenSSH server listen on port 443 if it isn’t already using the port.

This is sometimes given as a rationale for changing the sshd port completely, but you don’t need to do that; you can simply add another Port directive to sshd_config(5):

Port 22
Port 443

After restarting the OpenSSH server with this new line in place, you can verify that it’s listening with ss(8) or netstat(8)

# ss -lnp src :22
State      Recv-Q Send-Q    Local Address:Port      Peer Address:Port
LISTEN     0      128                  :::22                  :::*
users:(("sshd",3039,6))
LISTEN     0      128                   *:22                   *:*
users:(("sshd",3039,5))
# ss -lnp src :443
State      Recv-Q Send-Q    Local Address:Port      Peer Address:Port
LISTEN     0      128                  :::443                 :::*
users:(("sshd",3039,4))
LISTEN     0      128                   *:443                  *:*
users:(("sshd",3039,3))

You’ll then be able to connect to the server on port 443, the same way you would on port 22. If you intend this setup to be permanent, it would be a good idea to save the configuration in your ssh_config(5) file, or whichever SSH client you happen to use.

Special characters in Vim

Particularly when editing documents for human consumption rather than code, it’s often necessary to enter special characters into a document that can’t otherwise be produced by a single key press:

  • Letters with diacritical marks like ä, é, and ô — Vim refers to these as digraphs — a particular problem when using a US keyboard layout
  • Unicode characters like typographic dashes or copyright symbols ©, or other symbols from the multi-byte portion of the UTF-8 character set (including foreign languages)
  • Literal control characters like <Tab>

Vim has a method for inserting each of these within the editor, rather than having to copy-paste them from another document. We won’t discuss Vim’s alternative multibyte input methods here, and will assume that you’re using a keyboard with a US or UK layout, and predominantly type in English — apologies to international readers, but I do not have another type of keyboard to test this out!

Some of the following assumes that you’re using Vim in a UTF-8 capable terminal, and with the encoding option in your .vimrc set to utf-8, which is highly recommended for the vast majority of editing requirements:

set encoding=utf-8

It also assumes that your font is capable of displaying all of the characters concerned; monospace fonts with workable symbol coverage include Consolas, Inconsolata, and Ubuntu Mono.

Digraphs

Vim has a special shorthand for entering characters with diacritical marks. If you need some familiar variant of a Latin alphabet character with a diacritical mark or embellishment, it’s likely you’ll be able to input it with the digraph system. It also has support for some other sometimes-needed characters like thorn Þ and eszett ß, and Cyrillic characters.

Digraph input is started in insert or command mode (but not normal mode) by pressing Ctrl-k, then two printable characters in succession; the first is often the “base” form of the letter, and the second denotes the appropriate embellishment.

Some simple examples that might occasionally be needed for English speakers to correctly type one of the language’s many “loan words”:

  • Ctrl-k c , -> ç
  • Ctrl-k e ' -> é
  • Ctrl-k o ^ -> ô
  • Ctrl-k a ! -> à
  • Ctrl-k u : -> ü
  • Ctrl-k = e ->

This is just a small sample; Vim has support for a great many digraphs. Take a look at the relevant section of the documentation for a complete treatment of the feature. You can also type :digraphs within Vim to get a complete list of digraphs — several screenfuls of them!

Note that you can enter all of these characters using the Unicode mode discussed later in this article as well; two-character mnemonic digraphs simply happen to be easier to remember than four-digit codes.

Unicode characters

For characters not covered in the digraph set, you can also enter unicode characters by referring to their code page number. In insert or command mode (but not normal mode) this is done by typing Ctrl-v and then u, followed by the hexadecimal number. Some potentially useful examples:

  • Ctrl-v u 2018 -> , a LEFT SINGLE QUOTATION MARK
  • Ctrl-v u 2019 -> , a RIGHT SINGLE QUOTATION MARK
  • Ctrl-v u 2014 -> , an EM DASH
  • Ctrl-v u 00a9 -> ©, a COPYRIGHT SIGN

These are handy in some cases when writing HTML documents, as an alternative to using HTML entities like &mdash; or &copy;. An exhaustive summary of these characters and their codes is available on the Unicode website.

Other non-printable characters

The unicode character input method is actually a specialised case of inputting literal characters with a Ctrl-v prefix. We can input other non-printable and control characters using this prefix:

  • Ctrl-v <Enter> -> ^M
  • Ctrl-v <Tab> -> ^I

This is sometimes handy when conforming to someone else’s tab style, and can also be handy when searching for characters literally in searches.

SSH, SOCKS, and cURL

Port forwarding using SSH tunnels is a convenient way to circumvent well-intentioned firewall rules, or to access resources on otherwise unaddressable networks, particularly those behind NAT (with addresses such as 192.168.0.1).

However, it has a shortcoming in that it only allows us to address a specific host and port on the remote end of the connection; if we forward a local port to machine A on the remote subnet, we can’t also reach machine B unless we forward another port. Fetching documents from a single server therefore works just fine, but browsing multiple resources over the endpoint is a hassle.

The proper way to do this, if possible, is to have a VPN connection into the appropriate network, whether via a virtual interface or a network route through an IPsec tunnel. In cases where this isn’t possible or practicable, we can use a SOCKS proxy set up via an SSH connection to delegate all kinds of network connections through a remote machine, using its exact network stack, provided our client application supports it.

Being command-line junkies, we’ll show how to set the tunnel up with ssh and to retrieve resources on it via curl, but of course graphical browsers are able to use SOCKS proxies as well.

As an added benefit, using this for browsing implicitly encrypts all of the traffic up to the remote endpoint of the SSH connection, including the addresses of the machines you’re contacting; it’s thus a useful way to protect unencrypted traffic from snoopers on your local network, or to circumvent firewall policies.

Establishing the tunnel

First of all we’ll make an SSH connection to the machine we’d like to act as a SOCKS proxy, which has access to the network services that we don’t. Perhaps it’s the only publically addressable machine in the network.

$ ssh -fN -D localhost:8001 remote.example.com

In this example, we’re backgrounding the connection immediately with -f, and explicitly saying we don’t intend to run a command or shell with -N. We’re only interested in establishing the tunnel.

Of course, if you do want a shell as well, you can leave these options out:

$ ssh -D localhost:8001 remote.example.com

If the tunnel setup fails, check that AllowTcpForwarding is set to yes in /etc/ssh/sshd_config on the remote machine:

AllowTcpForwarding yes

Note that in both cases we use localhost rather than 127.0.0.1, in order to establish both IPv4 and IPv6 sockets if appropriate.

We can then check that the tunnel is established with ss on GNU/Linux:

# ss dst :8001
State      Recv-Q Send-Q   Local Address:Port       Peer Address:Port
ESTAB      0      0            127.0.0.1:45666         127.0.0.1:8001
ESTAB      0      0            127.0.0.1:45656         127.0.0.1:8001
ESTAB      0      0            127.0.0.1:45654         127.0.0.1:8001

Requesting documents

Now that we have a SOCKS proxy running on the far end of the tunnel, we can use it to retrieve documents from some of the servers that are otherwise inaccessible. For example, when we were trying to run this from the client side, we found it wouldn’t work:

$ curl http://private.example/contacts.html
curl: (6) Couldn't resolve host 'private.example'

This is because the example subnet is on a remote and unroutable LAN. If its name comes from a private DNS server, we may not even be able to resolve its address, let alone retrieve the document.

We can fix both problems with our local SOCKS proxy, by pointing curl to it with its --proxy option:

$ curl --proxy socks5h://localhost:8001 http://private.example/contacts.html
<!DOCTYPE HTML PUBLIC "-//W3C//DTD HTML 3.2 Final//EN">
<html>
    <head>
        <title>Contacts</title>
...

Older versions of curl may need to use the --socks5-hostname option:

$ curl --socks5-hostname localhost:8001 http://private.example/contacts.html

This not only tunnels our HTTP request through to remote.example.com and returns any response, it does the DNS lookup on the other end too. This means we can not only retrieve documents from remote servers, we can resolve their hostnames too, even if our client side can’t contact the appropriate DNS server on its own. This is what the h suffix does in the socks5h:// URI syntax above.

We can configure graphical web browsers to use the SOCKS proxy in the same way, optionally including DNS resolution:

Browsers are not the only application that can use SOCKS proxies; many IM clients such as Pidgin and Bitlbee can use them too, for example.

Making things more permanent

If this all works for you and you’d like to set up the SOCKS proxy on the far end each time you connect, you can add it to your ssh_config file in $HOME/.ssh/config:

Host remote.example.com
    DynamicForward localhost:8001

With this done, you should only need to type the hostname of the machine to get a shell and to set up the dynamic forward in the background:

$ ssh remote.example.com

Advanced Vim registers

Registers in Vim are best thought of as scratch spaces for text, some of which are automatically filled by the editor in response to certain actions. Learning how to use registers fluently has a lot of subtle benefits, although it takes some getting used to because the syntax for using them is a little awkward.

If you’re reasonably fluent with Vim by now, it’s likely you’re already familiar with the basic usage of the 26 named registers, corresponding to the letters of the alphabet. These are commonly used for recording macros; for example, to record a series of keystrokes into register a, you might start recording with qa, and finish with q; your keystrokes could then be executed with @a.

Similarly, we can store text from the buffer itself rather than commands in these registers, by prepending "a to any command which uses a register, such as the c, d, and y commands:

  • "ayy — Read current line into register a.
  • "bP — Paste contents of register b above current line.
  • "cc3w — Change three words, putting the previous three words into register c.

Like many things in Vim, there’s a great deal more functionality to registers for those willing to explore.

Note that here I’ll be specifically ignoring the *, +, and ~ registers; that’s another post about the generally unpleasant business of making Vim play nice with system clipboards. Instead, I’ll be focussing on stuff that only applies within a Vim session. All of this is documented in :help registers.

Capital registers

Yanking and deleting text into registers normally replaces the previous contents of that register. In some cases it would be preferable to append to a register, for example while cherry-picking different lines from the file to be pasted elsewhere. This can be done by simply capitalizing the name of the register as it’s referenced:

  • "ayyReplace the contents of register a with the current line.
  • "AyyAppend the current line to register a.

This works for any context in which an alphabetical register can be used. Similarly, to append to a macro already recorded in register a, we can start recording with qA to add more keystrokes to it.

Viewing register contents

A good way to start getting a feel for how all the other registers work is to view a list of them with their contents during an editing session with :registers. This will show the contents of any register used in the editing session. It might look something like this, a little inscrutable at first:

:registers
--- Registers ---
""   Note that much of it includes
"0   execut
"1   ^J^J
"2   16 Oct (2 days ago)^J^Jto Jeff, Alan ^JHi Jeff (cc Alan);^J^JPlease 
"3   <?php^Jheader("Content-Type: text/plain; charset=utf-8");^J?>^J.^J
"4   ^J
"5   Business-+InternationalTrade-TelegraphicTransfers-ReceivingInternati
"6   ../^J
"7       diff = auto^J    status = auto^J    branch = auto^J    interacti
"8   ^J[color]^J    ui = auto^J    diff = auto^J    status = auto^J    br
"9       ui = true^J
"a    escrow
"b   03wdei^R=2012-^R"^M^[0j
"c   a
"e   dui{<80>kb^[^[
"g   ^[gqqJgqqjkV>JgqqJV>^[Gkkkjohttp://tldp.org/LDP/abs/html/^[I[4]: ^[k
"h   ^[^Wh:w^Mgg:w^M^L:w^Mjk/src^Mllhh
"j   jjjkkkA Goo<80>kb<80>kb<80>kbThis one is good pio<80>kbped through a
"-   Note that much of it includes
".    OIt<80>kb<80>kb<80>kbIt might looks <80>kb<80>kb something like thi
":   register
"%   advanced-vim-registers.markdown
"/   Frij

The first column contains the name of the register, and the second its contents. The contents of any of these registers can be pasted into the buffer with "ap, where a is the name of any of them. Note that there are considerably more registers than just the named alphabetical ones mentioned above.

Unnamed register

The unnamed register is special in that it’s always written to in operations, no matter whether you specified another register or not. Thus if you delete a line with dd, the line’s contents are put into the unnamed register; if you delete it with "add, the line’s contents are put into both the unnamed register and into register a.

If you need to explicitly reference the contents of this register, you can use ", meaning you’d reference it by tapping " twice: "". One handy application for this is that you can yank text into the unnamed register and execute it directly as a macro with @".

Man, and you thought Perl looked like line noise.

Black hole register

Another simple register worth mentioning is the black hole register, referenced with "_. This register is special in that everything written to it is discarded. It’s the /dev/null of the Vim world; you can put your all into it, and it’ll never give anything back. A pretty toxic relationship.

This may not seem immediately useful, but it does come in handy when running an operation that you don’t want to clobber the existing contents of the unnamed register. For example, if you deleted three lines into the unnamed register with 3dd with the intent of pasting them elsewhere with p, but you wanted to delete another line before doing so, you could do that with "_dd; line gone, and no harm done.

Numbered registers

The read-only registers 0 through 9 are your “historical record” registers. The register 0 will always contain the most recently yanked text, but never deleted text; this is handy for performing a yank operation, at least one delete operation, and then pasting the text originally yanked with "0p.

The registers 1 through 9 are for deleted text, with "1 referencing the most recently deleted text, "2 the text deleted before that, and so on up to "9.

The small delete register

This read-only register, referenced by "-, stores any text that you deleted or changed that was less than one line in length, unless you specifically did so into some other named register. So if you just deleted three characters with 3x, you’ll find it in here.

Last inserted text register

The read-only register ". contains the text that you last inserted. Don’t make the mistake of using this to repeat an insert operation, though; just tap . for that after you leave insert mode, or have the foresight to prepend a number to your insert operation; for example, 6i.

Filename registers

The read-only register "% contains the name of the current buffer’s file. Similarly, the "# register contains the name of the alternate buffer’s file.

Command registers

The read-only register ": contains the most recently executed : command, such as :w or :help. This is likely only of interest to you if you’re wanting to paste your most recent command into your Vim buffer. For everything else, such as repeating or editing previous commands, you will almost certainly want to use the command window.

Search registers

The read-only register / contains the most recent search pattern; this can be handy for inserting the search pattern on the command line, by pressing Ctrl-R and then / — very useful for performing substitutions using the last search pattern.

Expression register

Here’s the black sheep of the bunch. The expression register = is used to treat the results of arbitrary expressions in register context. What that means in actual real words is that you can use it as a calculator, and the result is returned from the register.

Whenever the expression register is referenced, the cursor is put on the command line to input an expression, such as 2+2, which is ended with a carriage return.

This means in normal mode you can type "=2+2<Enter>p, and 4 will be placed after the cursor; in insert or command mode you can use Ctrl-R then =2+2<Enter> for the same result. If you don’t find this syntax as impossibly awkward as I do, then this may well suit you for quick inline calculations … personally, I’d drop to a shell and bust out bc for this.

Knowing your registers well isn’t as profound a productivity boost as squelching a few of the other Vim anti-patterns, but it can certainly save you some of the annoyance of lost text.
Start Vim with splits

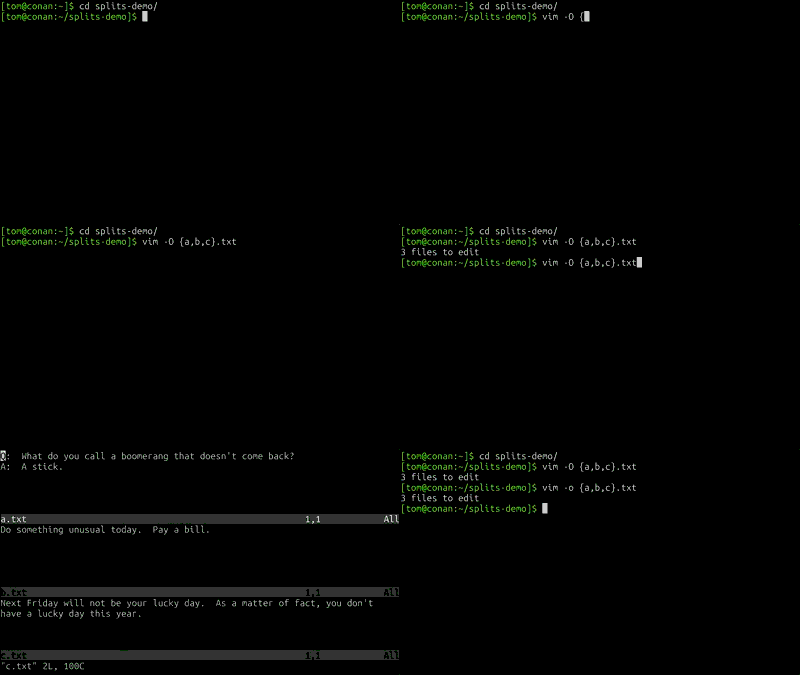
If you want to call Vim to edit more than one file, you can add an option to the command line to open all of the buffers in split windows on startup:

  • -O — Open all buffers in vertically split windows, like :vsp
  • -o — Open all buffers in horizontally split windows, like :sp

Command line splits

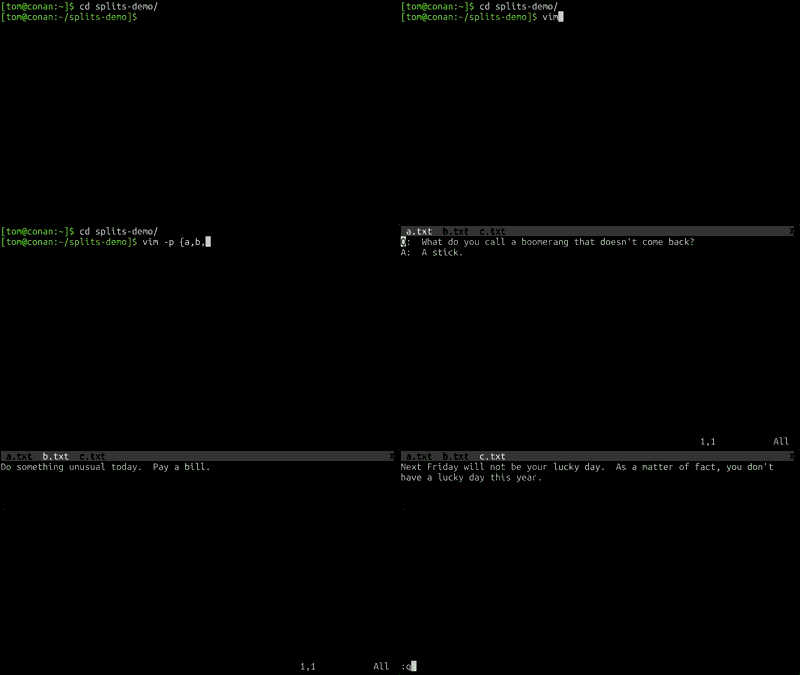
The same can also be done for tabs:

  • -p — Open all buffers in tabs, like :tabnew

Command line tabs