Vim eval feature

Using your .vimrc file on many machines with different versions and feature sets for Vim is generally not too much of a problem if you apply a little care in making a gracefully degrading .vimrc. In most cases, using the output of vim --version and checking the help files will tell you what features to check in order to determine which parts of your .vimrc configuration to load, and which to ignore.

There’s one particular feature that’s less obvious, though, and that’s eval. Vim’s help describes it like this in :help +eval:

N  *+eval*      expression evaluation |eval.txt|

The eval.txt document, in turn, describes the syntax for various features fundamental to Vimscript, including variables, functions, lists, and dictionaries.

All this makes eval perhaps the most central feature of Vim. Without it, Vim doesn’t have much of its programmable nature, and remains not much more than classic vi. If your particular build of Vim doesn’t include it, then Vimscript essentially does not work as a programming language, and elementary calls like function and let will throw errors:

E319: Sorry, the command is not available in this version: function
E319: Sorry, the command is not available in this version: let

If you’re getting this kind of error, you’re probably using a very stripped-down version of Vim that doesn’t include eval. If you just want to prevent the error by ignoring a block of code if the feature is unavailable, you can do this with has():

if has("eval")
    ...
endif

Vim will still be perfectly functional as a vi-style editor without +eval, but if you’re going to need any Vimscript at all, you should recompile Vim with a --with-features value for the ./configure line that does include it, such as normal, big, or huge, or install a more fully-featured packaged version. For example, on Debian-like systems, the vim-tiny package that is included in the netinst system does not include eval, but the vim and vim-runtime packages do.

Inspecting Vim’s source, in particular the ex_docmd.c file, gives some indication of how fundamental this feature is, applying the C function ex_ni which simply prints the “not available” error shown above to a large number of control structures and statements if the FEAT_EVAL constant is not defined:

#ifndef FEAT_EVAL
# define ex_scriptnames     ex_ni
# define ex_finish      ex_ni
# define ex_echo        ex_ni
# define ex_echohl      ex_ni
# define ex_execute     ex_ni
# define ex_call        ex_ni
# define ex_if          ex_ni
# define ex_endif       ex_ni
# define ex_else        ex_ni
# define ex_while       ex_ni
# define ex_continue        ex_ni
# define ex_break       ex_ni
# define ex_endwhile        ex_ni
# define ex_throw       ex_ni
# define ex_try         ex_ni
# define ex_catch       ex_ni
# define ex_finally     ex_ni
# define ex_endtry      ex_ni
# define ex_endfunction     ex_ni
# define ex_let         ex_ni
# define ex_unlet       ex_ni
# define ex_lockvar     ex_ni
# define ex_unlockvar       ex_ni
# define ex_function        ex_ni
# define ex_delfunction     ex_ni
# define ex_return      ex_ni
# define ex_oldfiles        ex_ni
#endif

Advanced Vim macros

Vim’s massive command set in both normal and command mode makes the concept of a macro especially powerful. Most Vim users, if they ever use macros at all, will perhaps quickly record an edit to one line, starting with qq and finishing with q, executing with @q, and otherwise never give the concept much thought.

For slightly more advanced Vim users, macros may be more frequently useful, but they perhaps still believe that macros are a niche Vim function unto themselves, and not really open to the deft manipulation of text that pretty much everything else in Vim is.

As is typical in Vim, the rabbit hole of functionality goes much deeper than most users will ever plumb.

Vanilla Vim macros

Suppose I had a plaintext table loaded into a Vim buffer containing the name, subject matter expertise, birth year, and nationality of a few well-known programmers:

Stallman  Richard GNU 1953  USA
Wall  Larry   Perl  1954  USA
Moolenar  Bram  Vim 1961  Netherlands
Tridgell  Andrew  Samba  1967  Australia
Matsumoto  Yukihiro  Ruby  1965  Japan
Ritchie  Dennis  C  1941  USA
Thompson  Ken  Unix  1943  USA

Actually, that’s kind of untidy. Let’s start by formatting it a bit, by running it through Unix’s column tool.

:%!column -t

Stallman   Richard   GNU    1953  USA
Wall       Larry     Perl   1954  USA
Moolenar   Bram      Vim    1961  Netherlands
Tridgell   Andrew    Samba  1967  Australia
Matsumoto  Yukihiro  Ruby   1965  Japan
Ritchie    Dennis    C      1941  USA
Thompson   Ken       Unix   1943  USA

May as well sort it by surname too:

:%!sort -k1

Matsumoto  Yukihiro  Ruby   1965  Japan
Moolenar   Bram      Vim    1961  Netherlands
Ritchie    Dennis    C      1941  USA
Stallman   Richard   GNU    1953  USA
Thompson   Ken       Unix   1943  USA
Tridgell   Andrew    Samba  1967  Australia
Wall       Larry     Perl   1954  USA

That’s better.

Now, suppose we’ve got the task of replacing the fourth column of this table with the approximate age of the person, which we can get naturally enough by sutracting their birth year from the current year. This is a little awkward to do in pure ex, so we’ll record a macro for doing it on one line.

Experimenting a bit, we find that the following works well:

03wdei^R=2012-^R"^M^[0j

Broken down, this does the following:

  • 0 — Move to the start of the line
  • 3w — Skip three words, in this case to the fourth column
  • de — Delete to the end of the word
  • i — Enter insert mode
  • ^R= — Insert the contents of the special = register, which accepts an expression to evaluate
  • 2012-^R"^M — Enter the expression 2012-(birth year) and press Enter (literal ^M), which completes the operation, and inserts the result
  • ^[ — Leave insert mode
  • 0 — Return to the start of the line
  • j — Move down a line

So we record it into a macro a (to stand for “age”, no other reason) as we fix up the first line:

qa03wdei^R=2012-^R"^M^[0jq

Matsumoto  Yukihiro  Ruby   47  Japan
Moolenar   Bram      Vim    1961  Netherlands
Ritchie    Dennis    C      1941  USA
Stallman   Richard   GNU    1953  USA
Thompson   Ken       Unix   1943  USA
Tridgell   Andrew    Samba  1967  Australia
Wall       Larry     Perl   1954  USA

This now means that for each line, we can run the macro by just tapping @a a few times:

Matsumoto  Yukihiro  Ruby   47  Japan
Moolenar   Bram      Vim    51  Netherlands
Ritchie    Dennis    C      71  USA
Stallman   Richard   GNU    59  USA
Thompson   Ken       Unix   69  USA
Tridgell   Andrew    Samba  45  Australia
Wall       Larry     Perl   58  USA

That’s all pretty stock-standard macro stuff that you’ll likely have learned in other tutorials. The only thing that’s slightly voodoo (and certainly not vi-compatible) is the arithmetic done with the special = register. You can read about that in :help @=, if you’re curious.

Repeating Vim macros

As a first very simple hint, if you’re running a macro several times, don’t forget that you can prepend a count to it; in our case, 6@a would have fixed up all the remaining lines. To take advantage of this, it’s good practice to compose your macros so that they make sense when run multiple times; in the example above, note that the end of the macro is moving down onto the next line, ready to run the macro again if appropriate.

Similarly, if you’ve already run a macro once, you can run the same one again by just tapping the @ key twice, @@. This repeats the last run macro. Again, you can prepend a count to this, @a5@@.

The true nature of Vim macros

The registers that hold macros are the same registers that you probably use more frequently for operations like deleting, yanking, and pasting. Running a macro is simply instructing Vim to take the contents of a register and execute them as keystrokes, as if you were actually typing them. Thinking about macros this way has a couple of interesting consequences.

First of all, it means you needn’t restrict yourself to the single-keystroke vi commands for Vim when you compose macros. You can include ex commands as well, for example to run a substitution during a macro:

qb:s/foo/bar/g^Mq
@b

Secondly, and more interestingly, all of the operations that you can apply to registers in general work with what we normally call macros, with the old standards, delete, yank, and paste. You can test this with the example macro demonstrated above, by typing "ap, which will dump the raw text straight into the buffer. Also like other registers, it’ll show up in the output of the :registers command.

All this means is that like everything else in Vim, macros are just text, and all of Vim’s clever tools can be used to work with them.

Editing Vim macros in a buffer

If you’ve used macros even a little bit you’ll be very familiar with how frustrating they are to record. For some reason, as soon as you press qa to start recording a macro into register a, your normal fluency with Vim commands goes out the window and you keep making mistakes that will make the macro unsuitable to apply.

So, don’t compose macros on the fly. Just stop doing it. I recommend that if a macro is more than three keystrokes, you should compose it directly in a scratch Vim buffer so that you can test it iteratively.

Here’s an example using the macro above; suppose I realise partway through writing it that I made a mistake in typing 2011 instead of 2012. I finish recording the rest of the macro anyway, and dump the broken keystrokes into a new scratch buffer:

:enew
"ap

This gives me the contents of the macro in plain text in the buffer:

qa03wdei^R=2011-^R"^M^[0jq

So now all I have to do is change that bad year to 2012, and then yank the whole thing back into register a:

^"ay$

Now I can test it directly with @a on the appropriate file, and if it’s still wrong, I just jump back to my scratch buffer and keep fixing it up until it works.

One potential snag here is that you have to enter keystrokes like Ctrl+R as literal characters, but once you know you can enter any keystroke in Vim literally in insert or command mode by prefixing it with Ctrl+V, that isn’t really a problem. So to enter a literal Ctrl+R in insert mode, you type Ctrl+V, then Ctrl+R.

Running a Vim macro on a set of lines

It’s occasionally handy to be able to run a macro that you’ve got ready on a specific subset of lines of the file, or perhaps just for every line. Fortunately, there’s a way to do this, too.

Using the :normal command, you’re able to run macros from the ex command line:

:normal @a

All it takes is prefixing this with any sort of range definition to allow you to run a macro on any set of lines that you’re able to define.

Run the macro on each line of the whole buffer:

:% normal @a

Between lines 10 and 20:

:10,20 normal @a

On the lines in the current visual selection:

:'<,'> normal @a

On the lines containing the pattern vim:

:g/vim/ normal @a

When you get confident using this, :norm is a nice abbreviation to use.

Moving a Vim macro into a function

For really useful macros of your own devising, it’s occasionally handy to put it into a function for use in scripts or keystroke mappings. Here again the :normal command comes in handy.

Suppose I wanted to keep the age calculation macro defined above for later use on spreadsheets of this kind. I’d start by dumping it into a new buffer:

:enew
"ap

The macro appears as raw text:

03wdei^R=2012-^R"^M^[0j

I prefix it with a :normal call, and wrap a function definition around it:

function! CalculateAge()
    normal 03wdei^R=2012-^R"^M^[0j 
endfunction

Then all I need to do is include that in a file that gets loaded during Vim’s startup, possibly just .vimrc. I can call it directly from ex:

:call CalculateAge()

But given that I wanted it to be a quick-access macro, maybe it’s better to bind it to \a, or whatever your chosen <leader> character is:

nnoremap <leader>a :call CalculateAge()<CR>

Saving a Vim macro

If you want to have a macro always available to you, that is, always loaded into the appropriate register at startup, that can be done in your .vimrc file with a call to let to fill the register with the literal characters required:

let @a='03wdei^R=2012-^R"^M^[0j'

Appending extra keystrokes to a Vim macro

If you just want to tack extra keystrokes onto an existing macro and don’t care to edit it in a Vim buffer, you can do that by recording into it with its capital letter equivalent. So, if you wanted to add more keystrokes into the register b, start recording with qB, and finish with the usual q.

Recursive Vim macros

If you’re crazy enough to need this, and I never have, there’s an excellent Vim Tip for it. But personally, I think if you need recursion in your text processing then it’s time to bust out a real programming language and not Vimscript to solve your problem.

If the issue for which you think you need recursion is running a macro on every line of a buffer with an arbitrary number of lines, then you don’t need recursion; just record a one-line version of the macro and call it with :% normal @a to run it on every line.

Vim macro gotchas

Here are a few gotchas which will save you some frustration if you know about them ahead of time:

  • When you have a hammer, everything starts to look like a nail. Don’t try to solve problems with macros when there are better solutions in the ex command set, or available in external programs. See the Vim koans page for a couple of examples.
  • You need to insert keystrokes like Enter as literal Ctrl+M, so that they look like ^M. The convenience abbreviations in mappings, like <CR>, simply don’t work. You’re likely to find yourself chording Ctrl+V a lot.
  • Macros tend to stop, sometimes for apparently no reason and with no warning messages, as soon as they hit some sort of error. One particularly annoying instance of this is when you’re performing several substitutions in a macro, because if it doesn’t find any instances of a pattern it will throw an error and stop executing. You can prevent this by adding the e flag to the substitution call:

    :s/foo/bar/e
    

Thanks to user bairui for suggesting a safer alternative for yanking macro lines from buffers, which I’ve changed. He’s written a whole blog post replying to this one. It’s a good read if you’re interested in going in to even more depth about when to use macros in Vim.
Local .vimrc files

If you can, it’s a good idea to set up your .vimrc file using conditionals so that it’s compatible on all of the systems with which you need to work. Using one .vimrc file enables you to include it as part of a centralised set of dotfiles that you can keep under version control.

However, if on a particular machine there’s a special case which means you need to load some Vim directives for that machine, you can achieve this by way of a local Vim file kept in .vimrc.local, only on one particular machine, and detecting its existence before attempting to load it in your master .vimrc file with the following stanza:

if filereadable(glob("~/.vimrc.local")) 
    source ~/.vimrc.local
endif

As an example, on one of the nameservers that I manage, I wanted to make sure that the correct filetype was loaded when editing zone files ending in .nz or .au for New Zealand and Australian domains. The following line in .vimrc.local did the trick:

autocmd BufNewFile,BufRead *.au,*.nz set filetype=bindzone

If the .vimrc.local file doesn’t exist on any particular machine, Vim will simply not attempt to load it on startup.

Besides machine-specific code, this kind of setup may be advisable if you keep secret or potentially sensitive information in your .vimrc file that you wouldn’t want published to a public version control tracker like GitHub, such as API keys, usernames, machine hostnames, or network paths.

Faster Vim search/replace

Entering search patterns and replacement strings in Vim can sometimes be a pain, particularly if the search or replacement text is already available in a register or under the cursor. There are a few ways to make working with search and replace in Vim quicker and less cumbersome for some common operations, and thereby save a bit of error-prone typing.

Insert contents of a register

As in command mode or insert mode, you can insert the contents of any register by pressing Ctrl+R and then the register key. For example, to directly insert the contents of register a, you can type Ctrl+R and then a while typing a search pattern or replacement string.

Reference contents of a register

Similarly, if you want to use the contents of a register in a pattern or replacement but don’t want to directly insert it, you can instead reference the contents of register a with \=@a:

:s/search/\=@a/

Both of the above tips work for both the search and replacement patterns, and for special registers like " (default unnamed register) and / (last searched text) as well as the alphabetical ones.

Insert word under cursor

If you happen to be hovering over a word that you want to use as as a search or replacement string, as a special case of the above you can do so by typing Ctrl+R and then Ctrl+W for a normal word, or Ctrl+R and then Ctrl+A for a space-delimited word.

Empty search string

You can use the previous search as a search pattern or replacement string by including it from the special / register, in the same way as any other register above, by inserting it with Ctrl+R and then /, or representing it with \=@/. There’s a convenient shorthand for this however in just using an empty search string:

:s//replacement/

This will replace all occurences of the previous search string with replacement. It turns out to be a particularly convenient shorthand when searching for words by pressing * or #.

Gracefully degrading .vimrc

If you work on many machines with varying operating systems (Windows, GNU/Linux, MacOS X, BSD) and in various upgrade states, particularly if some of the machines are a lot older or have more minimal or custom installations of Vim, you might not be using your .vimrc file on all of them because it includes features that aren’t available on some other machines, meaning that Vim spits a lot of errors at you on startup.

This might have prompted you to perhaps keep a simpler .vimrc file, a “lesser” .vimrc, that you put onto your remote machines, and you keep the “real” .vimrc on your own machine to include lines that use all of the features only available to you on that machine. If you like to version your configuration files, maintaining and testing both of the .vimrc files on all the machines gets old fast; it would be much better to have a single .vimrc file that simply ignored configuration it didn’t understand. There are several ways to approach this.

Check features

Perhaps the best way to manage this is to group all of your configuration items by Vim feature, and to check for their presence in your .vimrc file before attempting to set any of the relevant options. You can do this with the has() function. As an example, here’s a stanza from my .vimrc:

if has("spell")
    set spelllang=en_nz
    nnoremap <leader>s :set spell!<CR>
endif

I set the spellang option and perform the remapping only if the +spell feature is actually available.

If an option is dependent on a feature having been compiled into Vim, you can usually tell by calling :help on it and looking for a phrase like “not available when compiled without the +xyz feature.” You can also view a list all the features available with :help feature-list, and see which features are compiled into a given vim binary with the --version parameter:

$ vim --version
VIM - Vi IMproved 7.3 (2010 Aug 15, compiled Feb 11 2012 03:54:05) Included patches: 1-429
Modified by pkg-vim-maintainers@lists.alioth.debian.org
Compiled by jamessan@debian.org
Huge version with GTK2 GUI.  Features included (+) or not (-):
+arabic +autocmd +balloon_eval +browse ++builtin_terms +byte_offset +cindent
+clientserver +clipboard +cmdline_compl +cmdline_hist +cmdline_info +comments
+conceal +cryptv +cscope +cursorbind +cursorshape +dialog_con_gui +diff ...

There are certain special features, like +unix, that you can use to check whether the Vim instance running is on a platform suitable for an option or not. I find this is handy for choosing the correct syntax for specifying fonts on Windows:

if has("unix")
    set guifont=Inconsolata\ 14
else
    set guifont=Consolas:h12
endif

Check options

You can check whether an option itself exists rather than a feature with exists():

if exists("&foldenable")
    set foldenable
endif

Check version number

Another way of filtering out options for older versions of Vim is by version number, which you can perform by checking the value of v:version. For example, to only set folding options if you’re working with at least Vim 7, you could do:

if v:version >= 700
    set foldenable
endif

In this particular case, though, it’s a little clearer and more robust to check the condition with if has("folding"), because the version number being recent enough does not necessarily mean the feature exists. However, one good application of using version numbers is fixing bugs or unexpected behaviour in older instances of Vim, to make it behave consistently with newer versions, or even vice-versa if necessary.

Silent calls

If you can’t find a way to filter by feature or version number, a simple way to suppress any error messages from a configuration line is to preface it with silent!. I find this is a nice compact way to call plugin-dependent functions like pathogen#infect(), or custom colorschemes that you can’t be sure actually exist on the machine:

silent! call pathogen#infect()
silent! colorscheme zellner

Try/Catch/If

If you’re not dealing with versions of Vim older than 7.0, another possibility is the try/catch/endtry block. This is handy for setting a default or fallback option if a call fails, such as selecting colorschemes:

try
    colorscheme zenburn
catch
    colorscheme torte
endtry

This is my least-favoured method of making .vimrc files degrade gracefully, as it breaks completely on older instances of Vim.

Thanks to Reddit user bouncingsoul for suggesting the second method which I initially missed.

Debugging Vim setup

While Vim’s core is very stable, problems can come about when extending the editor with plugins, particularly if there are a high number of them or if they’re buggy or not very well written. While Vim offers a number of ways to keep scripts’ behaviours isolated from one another, it may happen that you find Vim behaving in an unexpected way that you can’t quite pin down. There are a few very good approaches to figuring this out.

List your scripts

First of all, it helps to get a handle on what exactly you’ve got loaded during your Vim sessions. You can do this with the :scriptnames command:

:scriptnames
1: /usr/share/vim/vimrc
2: /usr/share/vim/vim73/debian.vim
3: ~/.vimrc
4: ~/.dotfiles/vim/autoload/pathogen.vim
...

This list appears in the order in which the files were loaded, which might give you a starting point for figuring out where the problem lies.

Update your plugins

Check the documentation, release logs, known problems, and in particular the website of your chosen plugins to see if there are any recent updates to them. If they’re hosted on GitHub, pull down the most recent versions.

Start with no plugins

You can start Vim with no plugins, in a pristine state that doesn’t source any vimrc files from your system or home directories, to figure out if the behaviour you’re observing still occurs with no plugins at all installed. This is done by calling Vim with the -u and -U options, which normally specify the path to a custom location for vimrc and gvimrc files respectively, with the special parameter of NONE:

$ vim -u NONE -U NONE

Vim will open and you’ll see the usual blue tildes for opening a line and Vim’s opening splash screen, having completely ignored your laborious setup.

This done, you can source plugins individually until you notice the problem starts happening, by a process of elimination:

:so plugin/fugitive.vim
:so plugin/unimpaired.vim
:so plugin/badplugin.vim

Profile startup time

If Vim was compiled with the +startuptime feature, you can also pass the --startuptime flag to it with a filename argument, and it will save a verbose log of its startup procedure to that file for you to inspect:

$ vim +q --startuptime startuptime.txt
$ vim startuptime.txt

There’s way more information in here than you’re ever likely to need, but in the case of a buggy setup or unacceptably slow startup time, it’s very useful for diagnosing the bottleneck in your setup.

Vim anti-patterns

The benefits of getting to grips with Vim are immense in terms of editing speed and maintaining your “flow” when you’re on a roll, whether writing code, poetry, or prose, but because the learning curve is so steep for a text editor, it’s very easy to retain habits from your time learning the editor that stick with you well into mastery. Because Vim makes you so fast and fluent, it’s especially hard to root these out because you might not even notice them, but it’s worth it. Here I’ll list some of the more common ones.

Moving one line at a time

If you have to move more than a couple of lines, moving one line at a time by holding down j or k is inefficient. There are many more ways to move vertically in Vim. I find that the two most useful are moving by paragraph and by screenful, but this depends on how far and how precisely you have to move.

  • { — Move to start of previous paragraph or code block.
  • } — Move to end of next paragraph or code block.
  • Ctrl+F — Move forward one screenful.
  • Ctrl+B — Move backward one screenful.

If you happen to know precisely where you want to go, navigating by searching is the way to go, searching forward with / and backward with ?.

It’s always useful to jump back to where you were, as well, which is easily enough done with two backticks, or gi to go to the last place you inserted text. If you like, you can even go back and forth through your entire change list of positions with g; and g,.

Moving one character at a time

Similarly, moving one character at a time with h and l is often a waste when you have t and f:

  • t<char> — Move forward until the next occurrence of the character.
  • f<char> — Move forward over the next occurrence of the character.
  • T<char> — Move backward until the previous occurrence of the character.
  • F<char> — Move backward over the previous occurrence of the character.

Moving wordwise with w, W, b, B, e, and E is better, too. Again, searching to navigate is good here, and don’t forget you can yankdelete or change forward or backward to a search result:

y/search<Enter>
y?search<Enter>
d/search<Enter>
d?search<Enter>
c/search<Enter>
c?search<Enter>

Searching for the word under the cursor

Don’t bother typing it, or yanking/pasting it; just use * or #. It’s dizzying how much faster this feels when you use it enough for it to become automatic.

Deleting, then inserting

Deleting text with intent to replace it by entering insert mode immediately afterward isn’t necessary:

d2wi

It’s quicker and tidier to use c for change:

c2w

This has the added benefit of making the entire operation repeatable with the . command.

Using the arrow keys

Vim lets you use the arrow keys to move around in both insert and normal mode, but once you’re used to using hjkl to navigate, moving to the arrow keys to move around in text feels clumsy; you should be able to spend the vast majority of a Vim session with your hands firmly centered around home row. Similarly, while the Home and End keys work the same way they do in most editors, there’s no particular reason to use them when functional equivalents are closer to home in ^ and $.

So wean yourself off the arrow keys, by the simple expedient of disabling them entirely, at least temporarily:

noremap <Up> <nop>
noremap <Down> <nop>
noremap <Left> <nop>
noremap <Right> <nop>

The benefits of sticking to home row aren’t simply in speed; it feels nicer to be able to rest your wrists in front of the keyboard and not have to move them too far, and for some people it has even helped prevent repetitive strain injury.

Moving in insert mode

There’s an additional benefit to the above in that it will ease you into thinking less about insert mode as a mode in which you move around; that’s what normal mode is for. You should, in general, spend as little time in insert mode as possible. When you want to move, you’ll get in the habit of leaving insert mode, and moving around far more efficiently in normal mode instead. This distinction also helps to keep your insert operations more atomic, and hence more useful to repeat.

Moving to Escape

The Escape key on modern keyboards is a lot further from home row than it was on Bill Joy’s keyboard back when he designed vi. Hitting Escape is usually unnecessary; Ctrl+[ is a lot closer, and more comfortable. It doesn’t take long using this combination instead to make reaching for Escape as you did when you were a newbie feel very awkward. You might also consider mapping the otherwise pretty useless Caps Lock key to be another Escape key in your operating system, or even mapping uncommon key combinations like jj to Escape. I feel this is a bit drastic, but it works well for a lot of people:

inoremap jj <Esc>

Moving to the start or end of the line, then inserting

Just use I and A. Again, these make the action repeatable for other lines which might need the same operation.

Entering insert mode, then opening a new line

Just use o and O to open a new line below and above respectively, and enter insert mode on it at the same time.

Entering insert mode to delete text

This is a pretty obvious contradiction. Instead, delete the text by moving to it and using d with an appropriate motion or text object. Again, this is repeatable, and means you’re not holding down Backspace. In general, if you’re holding down a key in Vim, there’s probably a faster way.

Repeating commands or searches

Just type @: for commands or n/N for searches; Vim doesn’t forget what your last search was as soon as you stop flicking through results. If it wasn’t your most recent command or search but it’s definitely in your history, just type q: or q/, find it in the list, and hit Enter.

Repeating substitutions

Just type & to repeat the last substitution on the current line. You can repeat it on all lines by typing g&.

Repeating macro calls

Just type @@.

These are really only just a few of the common traps to avoid to increase your speed and general efficiency with the editor without requiring plugins or substantial remappings. Check out the Vim Tips wiki for some other really helpful examples.

Vim command window

The command line in Vim for ex commands can be edited with a few of the GNU Readline key combinations that may be familiar to Bash or Emacs users, so it’s reasonably easy to edit it, for example to type in complex search patterns and replacements.

However, if you want the full facility of Vim editing for your commands, it can be helpful to use Vim’s command line window, which will allow you to enter commands and edit previous ones with the usual normal and insert mode.

You can open the command line window from normal mode in one of four ways:

  • q: — Open with a command history from normal mode
  • q/ — Open with a search history from normal mode (to search forward)
  • q? — Open with a search history from normal mode (to search backward)
  • Ctrl+F — Open with a command history from command mode

Note that this doesn’t work while you’re recording macros, since pressing q stops the recording.

The window is always immediately above the status bar, and its height can be set via the cmdwinheight option.

Command line window

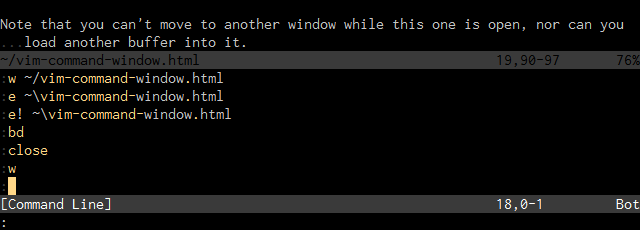
Once the command line window is opened with q:, you can browse through it and press Enter on any line to issue the same command again. You can also edit it beforehand, perhaps to fix a mistyped command. The window will close when this is done, but you can close it with Ctrl+W, C the same as any other window if you change your mind.

Vim command line window

Vim command line window

Note that you can’t move to another window while this one is open, nor can you load another buffer into it.

Search window

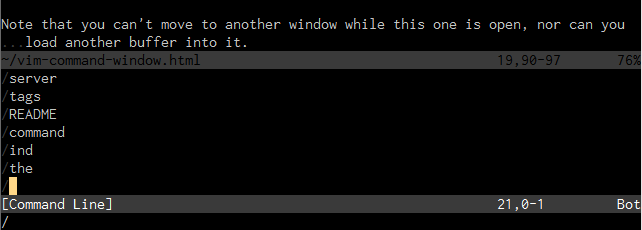
Similar to the above, if you open the command window with q/ or q?, it shows a history of your searches, and pressing enter on any line will issue the same again, in the appropriate direction.

Vim search window

Vim search window

For more information on how the command window works, check out :help command-line-window.

Vim filename completion

The autocompletion for filenames in Vim in command mode is very useful, but by default it’s a bit confusing for people accustomed to tab completion in Bash because it doesn’t quite work the same way. Pressing Tab will complete the filename to the first match, and subsequent presses will not elicit any list of possible completions that might otherwise be expected; for that, by default you need to press Ctrl+D rather than Tab.

Tab then tab

Fortunately, this is easily changed by using Vim’s wildmenu, in an appropriate mode. Set the following options in your .vimrc:

set wildmenu
set wildmode=longest,list

You should now find that when you complete filenames after commands like :w and :e, the paths expand in a similar manner to the way they do in the shell. If you’d prefer to only press Tab once to get both the longest matching unique string and a list of possible complete matches, that’s possible to arrange in both Bash and Vim as well.

Ignoring file types

There are probably certain filetypes in your directories that you’ll never want to edit with Vim. There’s hence no point in making them options for the autocompletion, and you can exclude them by pattern to make searching for the right file a bit quicker. This is done using the wildignore pattern. I use the following settings:

set wildignore+=*.a,*.o
set wildignore+=*.bmp,*.gif,*.ico,*.jpg,*.png
set wildignore+=.DS_Store,.git,.hg,.svn
set wildignore+=*~,*.swp,*.tmp

Compatibility

For the sake of keeping my .vimrc consistent and compatible on both older and newer machines, I like to wrap these options in a conditional block checking that the wildmenu feature is actually available:

" Wildmenu
if has("wildmenu")
    set wildignore+=*.a,*.o
    set wildignore+=*.bmp,*.gif,*.ico,*.jpg,*.png
    set wildignore+=.DS_Store,.git,.hg,.svn
    set wildignore+=*~,*.swp,*.tmp
    set wildmenu
    set wildmode=longest,list
endif

Insert mode

You can also complete file paths and names in insert mode with Ctrl+X Ctrl+F. It can be handy to map this to Tab if you don’t use it for anything else:

inoremap <Tab> <C-X><C-F>

Using more of ex

The original vi is a visual extension of an editor called ex, itself an evolution of the editors em and ed. The single-keystroke commands used in the visual mode of the ex editor were mappings to something that could be done with the command mode of ex. It’s therefore not quite right to say that vi evolved from ex; they’re the same program, differing only by invocation name and default mode.

Vim follows the same lineage, and so for most of the basic functions you can do in visual mode there exist analogues in the ex command language, sometimes enabling you to work with text in a more precisely defined way that can be difficult using visual mode.

There are certain standard ex commands that any Vim user will know, to edit a file, save a file, quit, and to perform substitutions. But the actual command set is vast, and there are a few tips using the ex command set that turn out to be very useful, particularly where filtering and transforming text is involved.

Using ranges intelligently

Most of the familiar linewise commands in Vim operate on ranges of lines. Such an operation familiar to most Vim users will be the global substitution:

:% s/text/replacement/

The % is shorthand for the entire file. By default, if you leave the % out, the substitute operation operates on the current line:

:s/text/replacement/

To make this explicit, you could define the range with ., which is a shorthand for the current line:

:. s/text/replacement/

You can use line numbers to define on which line you would like the replacement to occur:

:20 s/text/replacement/

This also allows comma-separated definitions, defining the start and end of a range, which can be absolute, as with the following that makes substitutions only between lines 20 and 30:

:20,30 s/text/replacement/

Or relative to the current line, where the following makes substitutions from two lines above to two lines below the current line:

:-2,+2 s/text/replacement/

It’s also worth noting that the last line in the file can be referred to with $:

:20,$ s/text/replacement/

Finally, if you have any marks defined in your text, you can refer to them in ranges by prefixing them with apostrophes. This will make substitutions from the line marked with a to the one marked b:

:'a,'b s/text/replacement/

This also works with Vim’s automatic marks, such as the ones created for you when you select some text in visual select mode. When you have some text selected and you press : to start a command, you might notice that Vim automatically inserts the range definition for you, as below:

:'<,'> s/text/replacement/

Other linewise operations

Substitution is far from the only linewise operation available in ex mode. You can use d to delete a range of lines:

:20,30 d

You can use y to yank them into the default register for pasting later:

:20,30 y

You can use m to move them to a specified line, and t to copy them:

:20,30 m 40
:20,30 t 40

And finally, you can simply print all matching lines with p:

:20,30 p

Text filters with g and v

The g and v commands can be used to define ranges based on the results of a regular expression search. Say you wanted to move all lines matching the regular expression /vim/ to the top of the file. This is easily done with:

:g/vim/ m 0

Conversely, you can retrieve a range of lines that don’t match a regular expression with v:

:v/vim/ m 0

These become especially useful because you can combine searched ranges with fixed ones, to only search a specified range of lines. In this example, only lines from 10 to 20 matching the regular expression /vim/ will be moved:

:10,20 g/vim/ m 0

Normal-mode operations

As a final tip, if you define a range of lines, you can also use the normal command to run a series of normal-mode keystroke commands on them. For example, if you wanted to add a semicolon to every line matching /vim/:

:g/vim/ norm A;

You can even extend this to run a macro held in a register over an appropriate range of lines, which I think is one of the most elegant examples of composing ex tools in clever ways:

:g/vim/ norm @a