Managing Vim plugins

While Vim’s built-in feature set is pretty vast and its tools can be adapted to pretty much any editing task, there’s still considerable value in using plugins to add functionality to the editor. Plugins range from simple functions or changes to the editing model, to complex behaviors that can make Vim compare in functionality to a full-blown IDE.

Selecting plugins

With the huge ecosystem of Vim plugins available and with experienced Vim users sharing their configurations and plugin setups proudly, it’s pretty easy to get excited and install umpteen plugins that you end up rarely if ever using. This is a bad idea for three main reasons:

  • Too many plugins, particularly low-quality ones, increases the loading time and the resource footprint of Vim.
  • Plugins often by design or accident break standard Vim functionality, meaning that when something goes wrong it’s irritating to diagnose which of your plugins caused it.
  • If you use many different machines, using a lot of plugins is burdensome if you have to keep them up to date, especially if the most recent version of Vim is not available to you on a particular machine.

Worse, some plugins, such as Cream, completely change the way Vim fundamentally works, which means if you install them early on in an attempt to get started with the editor you end up becoming reliant on the plugin for the most basic of editing tasks. It’s much better to actually learn Vim thoroughly first with a very minimal configuration, which will give you a much better idea of the feature set already available to you, and hence whether there’s any need to augment it. The general idea is that plugins should supplement Vim functionality, not replace it.

With this done, selecting plugins should be made based on two criteria: firstly, is it well-written and compatible, and secondly, do I actually need this functionality — that is, does it have some killer feature that makes my day much, much easier. If I can’t come up with a convincing use case for adding a plugin that would actually come up for me, then I don’t add it. Similarly, I don’t add anything that requires a lot of miscellaneous system dependencies or independent build procedures, which is why I don’t like the Command+T plugin much.

For example, at the moment I’m using the following plugins by Tim Pope:

  • Surround (supported by Repeat) which allows me to rapidly add, change, and delete delimiters of pretty much any kind around arbitrary text. Once you learn how to use this, it feels so natural that you wonder why it’s not in Vim by default.
  • Fugitive, a terrific plugin that brings a lot of Git functionality into Vim. The functions I most use in here are :Gblame to see where a block of code came from, and :Gdiff to add patches to and from the Git index for more meaningful commits.
  • Unimpaired, a set of matched mappings beginning with the square bracket keys. Most of them are at least moderately useful, but the killer feature for me here is the ability to escape and unescape text for XML, URLs, or C, which is really irritating to do by hand.

Managing plugins

If you plan to install extra plugins, I can’t recommend Pathogen enough. That’s also by Tim Pope. It allows you to keep plugins in their own directories in .vim/bundle, rather than interspersing them through directories like autoload and plugin. This makes keeping plugins updated much less laborious. Here’s how you can install it:

$ mkdir -p ~/.vim/bundle
$ cd ~/.vim
$ git clone git://github.com/tpope/vim-pathogen.git bundle/pathogen
$ mkdir autoload
$ cd autoload
$ ln -s ../bundle/pathogen/autoload/pathogen.vim

Then add the following into your .vimrc, after set nocompatible but before any filetype plugin settings:

silent! call pathogen#infect()

Now Pathogen should load for you any plugin you place in its own directory in .vim/bundle as if it had been added to the usual plugin and other directories. For example, to install Fugitive, you could run:

$ cd .vim/bundle
$ git clone git://github.com/tpope/vim-fugitive.git fugitive

Plugins as Git submodules

For a really high-tech Vim setup, consider managing your plugins as submodules of your dotfiles repository. Drew Neil explains this system very well in one of his Vimcasts.
Sahara Vim colorscheme

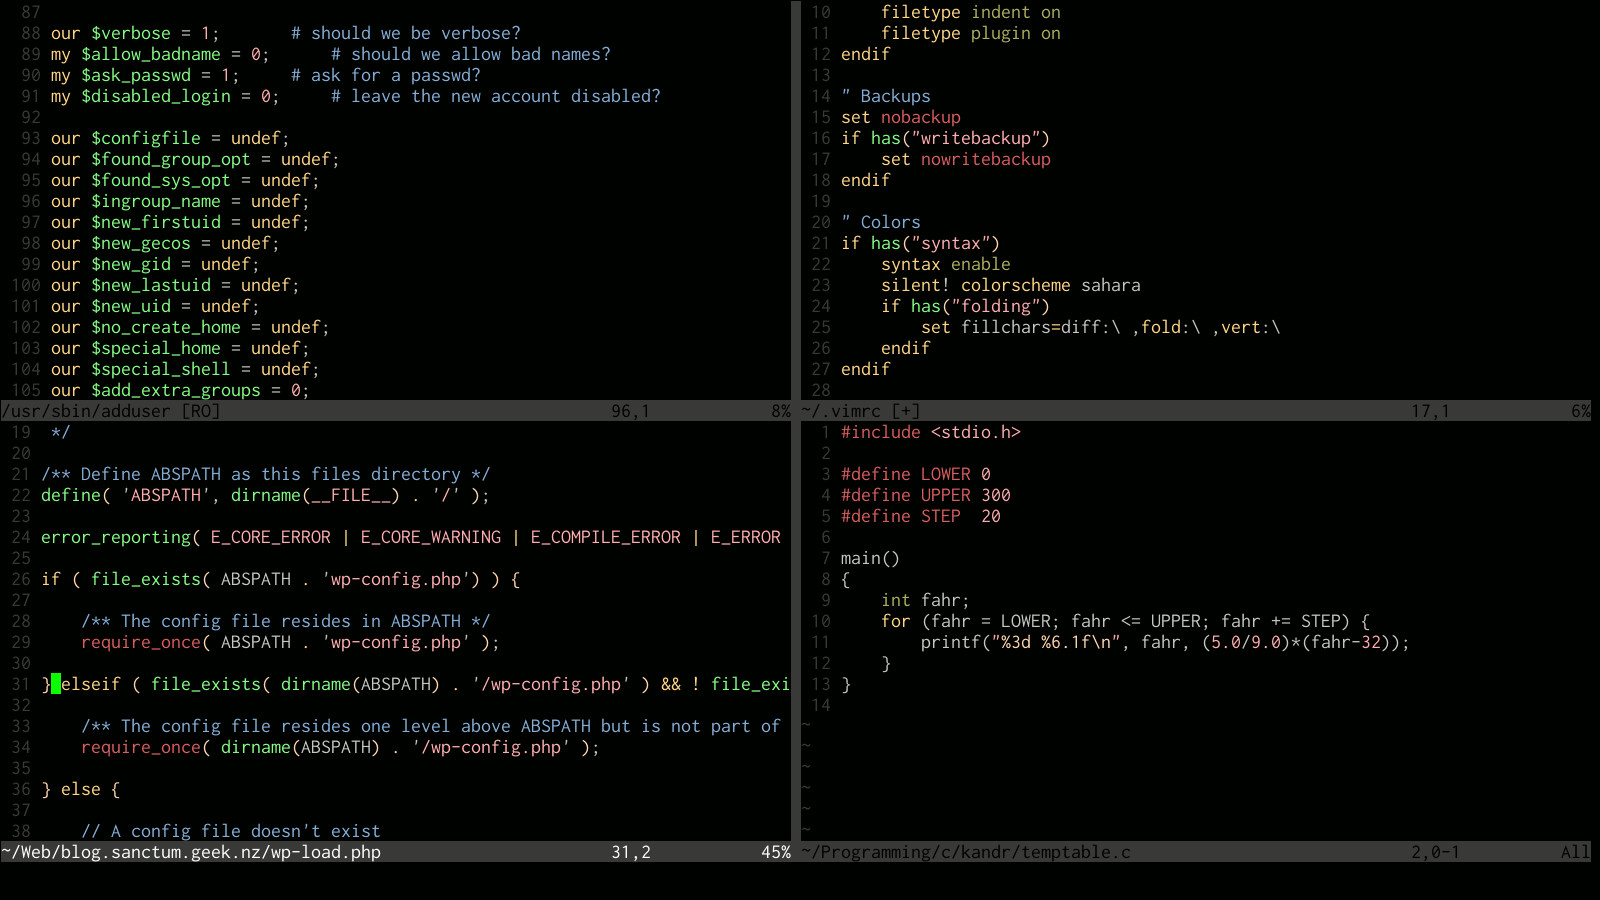
Not being too fussy about colorschemes in Vim, and spending much more time in terminals on various machines rather than being able to use a GUI wrapper with Vim for full color, I stuck with desert256 for quite some time because it was one of the defaults, worked pretty much everywhere, and looked sensible for most of the languages in which I write. I have found a few things that I wanted to change though, in particular completely removing the clunky color-approximation code that never quite worked right for me. I’m calling my fork Sahara.

Other changes include:

  • Most inactive or non-text regions are now in dark grey, including line numbers and window separators
  • Clearer indication of inactive and active windows with black and white status bar text respectively
  • Removed some unnecessary noise from HTML and PHP syntax highlighting with a couple of linked groups
  • Red, green, and blue backgrounds for removed, added, and changed sections in vimdiff
  • Monochrome tones for the autocompletion menu to replace the pretty horrifying defaults
  • Aqua for incremental search, deep blue for completed search highlighting

These are mostly pretty subtle changes, but if you use gVim or a 256-color terminal as well and you like the way desert256 works, this could possibly be of use to you. There’s a Git repository for it.

Screenshot using the Sahara colorscheme

Screenshot using the Sahara colorscheme

Vim command typos

I very often “fat-finger” some of the most common commands in Vim by holding down Shift too long after typing a colon. This means that instead of typing :w I end up typing :W, or :Qa instead of :qa, and because I use these commands so often, I type them so rapidly and reflexively that mistakes become quite common.

Since the uppercase versions of these oft-mistyped commands don’t actually correspond to any other valid command, I considered it safe to map them so that it would quietly accept this common mistake from me and understand what I actually meant to do. I did this with the following lines in my .vimrc:

if has("user_commands")
    command! -bang -nargs=? -complete=file E e<bang> <args>
    command! -bang -nargs=? -complete=file W w<bang> <args>
    command! -bang -nargs=? -complete=file Wq wq<bang> <args>
    command! -bang -nargs=? -complete=file WQ wq<bang> <args>
    command! -bang Wa wa<bang>
    command! -bang WA wa<bang>
    command! -bang Q q<bang>
    command! -bang QA qa<bang>
    command! -bang Qa qa<bang>
endif

Note the -bang and <bang> parts of each line; this allows me to include an exclamation mark in my mistyped command to force the command if a buffer is unsaved, which otherwise wouldn’t work. Additionally, I use command! with an exclamation mark to prevent errors if I reload my .vimrc file having already loaded it once. Finally, the first four commands, which can optionally take an argument, are set up to do that in their capitalised form as well.

You can list these commands and any others you or your plugins have defined by typing just :command by itself. Check out :help command for a bit more information on mapping commands in this manner.

The wrong way

This is quite different from the approach I often see recommended to work around this problem, which is using cnoreabbrev like so:

cnoreabbrev W w
cnoreabbrev Q q

I think this is a pretty bad idea because if I wanted to search for a single uppercase Q or W, it gets automatically mapped back to its lowercase equivalent in the search window. When I tried these mappings out I noticed this very quickly, and because I use case-sensitive search it rapidly got very frustrating. I am much happier with the solution I describe above, and particularly recommend it if like myself you prefer to keep ignorecase off.

Remapping for a different approach

If you don’t mind a slightly more drastic remapping, you could use another character that doesn’t require holding Shift to initiate commands, such as a semicolon, which means you won’t accidentally capitalise these common commands anymore:

nnoremap ; :

I don’t like this solution either, because the semicolon already has a function in repeating the linewise character searches you can do with f, t, F, and T, but I have seen it in several other people’s .vimrc files.

Buffers, windows, and tabs

If you’ve moved to Vim from an editor like Notepad++ or TextMate, you’ll be used to working with the idea of tabs in a text editor in a certain way. Specifically, a tab represents an open file; while the tab’s there, you’ve got an open file, as soon as you close it, it goes away. This one-to-one correspondence is pretty straightforward and is analogous to using tabs in a web browser; while the page is open, there’s a tab there, and you have one page per tab, and one tab per page.

Vim has a system for tabs as well, but it works in a completely different way from how text editors and browsers do. Beginners with Vim are often frustrated by this because the model for tabs is used so consistently in pretty much every other program they’re accustomed to, and they might end up spending a lot of fruitless time trying to force Vim to follow the same model through its configuration.

I think a good way to understand the differences in concept and usage between Vim’s three levels of view abstraction — buffers, windows, and tabs — is to learn how to use each from the ground up. So let’s start with buffers.

Buffers

A buffer in Vim is probably best thought of for most users as an open instance of a file, that may not necessarily be visible on the current screen. There’s probably a more accurate technical definition as a buffer need not actually correspond to a file on your disk, but it’ll work for our purposes.

When you open a single file in Vim, that file gets put into a buffer, and it’s the only buffer there on startup. If this buffer is unmodified (or if you’re using hidden), and you open another file with :edit, that buffer goes into the background and you start working with the new file. The previous buffer only goes away when you explicitly delete it with a call to :quit or :bdelete, and even then it’s still recoverable unless you do :bwipe.

By default, a buffer can only be in the background like this if it’s unmodified. You can remove this restriction if you like with the :set hidden option.

You can get a quick list of the buffers open in a Vim session with :ls. This all means that when most people think of tabs in more familiar text editors, the idea of a buffer in Vim is actually closest to what they’re thinking.

Windows

A window in Vim is a viewport onto a single buffer. When you open a new window with :split or :vsplit, you can include a filename in the call. This opens the file in a new buffer, and then opens a new window as a view onto it. A buffer can be viewed in multiple windows within a single Vim session; you could have a hundred windows editing the same buffer if you wanted to.

Windows in Vim

Vim Session with multiple windows open, both horizontally and vertically.

Tabs

Finally, a tab in Vim is a collection of one or more windows. The best way to think of tabs, therefore, is as enabling you to group windows usefully. For example, if you were working on code for both a client program and a server program, you could have the files for the client program open in the first tab, perhaps in three or four windows, and the files for the server program open in another, which could be, say, seven windows. You can then flick back and forth between the tabs using :tabn and :tabp.

Tab usage in Vim

Two tabs open in Vim, each with multiple windows. Move between two tabs with :tabn and :tabp.

This model of buffers, windows, and tabs is quite a bit more intricate than in other editors, and the terms are sometimes confusing. However, if you know a bit about how they’re supposed to work, you get a great deal more control over the layout of your editing sessions as a result. Personally, I find I rarely need tabs as with a monitor of sufficient size it suffices to keep two or three windows open at a time when working on sets of files, but on the odd occasion I do need tabs, I do find them tremendously useful.

Thanks to Hacker News users anonymous and m0shen for pointing out potential confusion with the :set hidden option and the :bdelete command.

Vim search highlighting

Being able to search by regular expression is a pretty fundamental thing in a text editor. Vim takes it to the next level by making entering a search into a motion all on its own, and even a few weeks’ Vim experience and you’ll probably catch yourself using the search to navigate your buffers.

One of the things I most commonly see recommended in threads and discussions about useful Vim features includes turning on two kinds of search highlighting: first, highlighting the search result on which you’ll land as you type it, and secondly, once you’ve pressed Enter to run your search, highlighting all of the matches. You turn these on like this:

:set incsearch
:set hlsearch

This ends up being great for editing code in particular, because if you search for variable or function names, you can see at a glance where they’re declared, defined, or used in your code. Couple that with the quick forward and backward search that you can do with the * and # keys, and you have a very convenient way to flick through successive uses of an identifier.

The only snag, really, is that it doesn’t turn itself off, and it gets visually distracting when you’ve moved on from whatever task prompted the search, and because you might search to move around, you don’t always actually want the highlighting to stay there. Text editors following a Windows model would probably clear away the highlighting as soon as you close the search box, or insert some text. This isn’t the case with Vim, which can be good or bad, but most people I’ve spoken to about this feature seem to find it annoying.

Bram Moolenar, the author of Vim, addressed this very topic in a Google Tech Talk he gave about effective text editing. You can turn off the highlighting temporarily by typing:

:nohlsearch

This is different from :set nohlsearch in that it doesn’t permanently disable the highlighting. It’ll turn it on next time you search. I find this is kind of a pain to type, so I alias it to Ctrl+L in my .vimrc file, so that in addition to its default behaviour of clearing the screen it clears the search highlighting as well:

nnoremap <C-l> :nohlsearch<CR><C-l>

Additionally, I like to set leader keys to quickly turn the highlighting option on and off completely if for some particular project it’s just thoroughly unhelpful. In this example, typing \i and \h will toggle the incsearch and hlsearch settings on and off, respectively. I’m assuming you’re using the backslash key as your <leader> here.

nnoremap <leader>i :set incsearch!<CR>
nnoremap <leader>h :set hlsearch!<CR>

Finally, I find that while I’m in insert mode, I usually don’t want to see the highlighting, so I define events to turn the highlighting off temporarily in the current buffer while I’m inserting text:

autocmd InsertEnter * :setlocal nohlsearch
autocmd InsertLeave * :setlocal hlsearch

I find these shortcuts make the search highlighting behaviour much less annoying. Interestingly, according to Vim’s help, you can’t simply add an event hook to run :nohlsearch when you enter Insert mode (from :help nohlsearch):

This command doesn’t work in an autocommand, because the highlighting state is saved and restored when executing autocommands. Same thing for when invoking a user function.

You can work around this by setting the search pattern to empty instead, as suggested by this Stack Overflow answer, but I don’t really like doing that because I often like to recurse through more search results with n and N after leaving insert mode.