Using more of ex

The original vi is a visual extension of an editor called ex, itself an evolution of the editors em and ed. The single-keystroke commands used in the visual mode of the ex editor were mappings to something that could be done with the command mode of ex. It’s therefore not quite right to say that vi evolved from ex; they’re the same program, differing only by invocation name and default mode.

Vim follows the same lineage, and so for most of the basic functions you can do in visual mode there exist analogues in the ex command language, sometimes enabling you to work with text in a more precisely defined way that can be difficult using visual mode.

There are certain standard ex commands that any Vim user will know, to edit a file, save a file, quit, and to perform substitutions. But the actual command set is vast, and there are a few tips using the ex command set that turn out to be very useful, particularly where filtering and transforming text is involved.

Using ranges intelligently

Most of the familiar linewise commands in Vim operate on ranges of lines. Such an operation familiar to most Vim users will be the global substitution:

:% s/text/replacement/

The % is shorthand for the entire file. By default, if you leave the % out, the substitute operation operates on the current line:

:s/text/replacement/

To make this explicit, you could define the range with ., which is a shorthand for the current line:

:. s/text/replacement/

You can use line numbers to define on which line you would like the replacement to occur:

:20 s/text/replacement/

This also allows comma-separated definitions, defining the start and end of a range, which can be absolute, as with the following that makes substitutions only between lines 20 and 30:

:20,30 s/text/replacement/

Or relative to the current line, where the following makes substitutions from two lines above to two lines below the current line:

:-2,+2 s/text/replacement/

It’s also worth noting that the last line in the file can be referred to with $:

:20,$ s/text/replacement/

Finally, if you have any marks defined in your text, you can refer to them in ranges by prefixing them with apostrophes. This will make substitutions from the line marked with a to the one marked b:

:'a,'b s/text/replacement/

This also works with Vim’s automatic marks, such as the ones created for you when you select some text in visual select mode. When you have some text selected and you press : to start a command, you might notice that Vim automatically inserts the range definition for you, as below:

:'<,'> s/text/replacement/

Other linewise operations

Substitution is far from the only linewise operation available in ex mode. You can use d to delete a range of lines:

:20,30 d

You can use y to yank them into the default register for pasting later:

:20,30 y

You can use m to move them to a specified line, and t to copy them:

:20,30 m 40
:20,30 t 40

And finally, you can simply print all matching lines with p:

:20,30 p

Text filters with g and v

The g and v commands can be used to define ranges based on the results of a regular expression search. Say you wanted to move all lines matching the regular expression /vim/ to the top of the file. This is easily done with:

:g/vim/ m 0

Conversely, you can retrieve a range of lines that don’t match a regular expression with v:

:v/vim/ m 0

These become especially useful because you can combine searched ranges with fixed ones, to only search a specified range of lines. In this example, only lines from 10 to 20 matching the regular expression /vim/ will be moved:

:10,20 g/vim/ m 0

Normal-mode operations

As a final tip, if you define a range of lines, you can also use the normal command to run a series of normal-mode keystroke commands on them. For example, if you wanted to add a semicolon to every line matching /vim/:

:g/vim/ norm A;

You can even extend this to run a macro held in a register over an appropriate range of lines, which I think is one of the most elegant examples of composing ex tools in clever ways:

:g/vim/ norm @a

Managing Vim plugins

While Vim’s built-in feature set is pretty vast and its tools can be adapted to pretty much any editing task, there’s still considerable value in using plugins to add functionality to the editor. Plugins range from simple functions or changes to the editing model, to complex behaviors that can make Vim compare in functionality to a full-blown IDE.

Selecting plugins

With the huge ecosystem of Vim plugins available and with experienced Vim users sharing their configurations and plugin setups proudly, it’s pretty easy to get excited and install umpteen plugins that you end up rarely if ever using. This is a bad idea for three main reasons:

  • Too many plugins, particularly low-quality ones, increases the loading time and the resource footprint of Vim.
  • Plugins often by design or accident break standard Vim functionality, meaning that when something goes wrong it’s irritating to diagnose which of your plugins caused it.
  • If you use many different machines, using a lot of plugins is burdensome if you have to keep them up to date, especially if the most recent version of Vim is not available to you on a particular machine.

Worse, some plugins, such as Cream, completely change the way Vim fundamentally works, which means if you install them early on in an attempt to get started with the editor you end up becoming reliant on the plugin for the most basic of editing tasks. It’s much better to actually learn Vim thoroughly first with a very minimal configuration, which will give you a much better idea of the feature set already available to you, and hence whether there’s any need to augment it. The general idea is that plugins should supplement Vim functionality, not replace it.

With this done, selecting plugins should be made based on two criteria: firstly, is it well-written and compatible, and secondly, do I actually need this functionality — that is, does it have some killer feature that makes my day much, much easier. If I can’t come up with a convincing use case for adding a plugin that would actually come up for me, then I don’t add it. Similarly, I don’t add anything that requires a lot of miscellaneous system dependencies or independent build procedures, which is why I don’t like the Command+T plugin much.

For example, at the moment I’m using the following plugins by Tim Pope:

  • Surround (supported by Repeat) which allows me to rapidly add, change, and delete delimiters of pretty much any kind around arbitrary text. Once you learn how to use this, it feels so natural that you wonder why it’s not in Vim by default.
  • Fugitive, a terrific plugin that brings a lot of Git functionality into Vim. The functions I most use in here are :Gblame to see where a block of code came from, and :Gdiff to add patches to and from the Git index for more meaningful commits.
  • Unimpaired, a set of matched mappings beginning with the square bracket keys. Most of them are at least moderately useful, but the killer feature for me here is the ability to escape and unescape text for XML, URLs, or C, which is really irritating to do by hand.

Managing plugins

If you plan to install extra plugins, I can’t recommend Pathogen enough. That’s also by Tim Pope. It allows you to keep plugins in their own directories in .vim/bundle, rather than interspersing them through directories like autoload and plugin. This makes keeping plugins updated much less laborious. Here’s how you can install it:

$ mkdir -p ~/.vim/bundle
$ cd ~/.vim
$ git clone git://github.com/tpope/vim-pathogen.git bundle/pathogen
$ mkdir autoload
$ cd autoload
$ ln -s ../bundle/pathogen/autoload/pathogen.vim

Then add the following into your .vimrc, after set nocompatible but before any filetype plugin settings:

silent! call pathogen#infect()

Now Pathogen should load for you any plugin you place in its own directory in .vim/bundle as if it had been added to the usual plugin and other directories. For example, to install Fugitive, you could run:

$ cd .vim/bundle
$ git clone git://github.com/tpope/vim-fugitive.git fugitive

Plugins as Git submodules

For a really high-tech Vim setup, consider managing your plugins as submodules of your dotfiles repository. Drew Neil explains this system very well in one of his Vimcasts.

Perl references explained

Coming to Perl from PHP can be confusing because of the apparently similar and yet quite different ways the two languages use the $ identifier as a variable prefix. If you’re accustomed to PHP, you’ll be used to declaring variables of various types, using the $ prefix each time:

<?php
$string = "string";
$integer = 6;
$float = 1.337;
$object = new Object();

So when you begin working in Perl, you’re lulled into a false sense of security because it looks like you can do the same thing with any kind of data:

#!/usr/bin/perl
my $string = "string";
my $integer = 6;
my $float = 1.337;
my $object = Object->new();

But then you start dealing with arrays and hashes, and suddenly everything stops working the way you expect. Consider this snippet:

#!/usr/bin/perl
my $array = (1, 2, 3);
print $array. "\n";

That’s perfectly valid syntax. However, when you run it, expecting to see all your elements or at least an Array like in PHP, you get the output of “3”. Not being able to assign a list to a scalar, Perl just gives you the last item of the list instead. You sit there confused, wondering how on earth Perl could think that’s what you meant.

References in PHP

In PHP, every identifier is a reference, or pointer, towards some underlying data. PHP handles the memory management for you. When you declare an object, PHP writes the data into memory, and puts into the variable you define a reference to that data. The variable is not the data itself, it’s just a pointer to it. To oversimplify things a bit, what’s actually stored in your $variable is an address in memory, and not a sequence of data.

When PHP manages all this for you and you’re writing basic programs, you don’t really notice, because any time you actually use the value it gets dereferenced implicitly, meaning that PHP will use the data that the variable points to. So when you write something like:

$string = "string";
print $string;

The output you get is “string”, and not “0x00abf0a9”, which might be the “real” value of $string as an address in memory. In this way, PHP is kind of coddling you a bit. In fact, if you actually want two identifiers to point to the same piece of data rather than making a copy in memory, you have to use a special reference syntax:

$string2 = &$string1;

Perl and C programmers aren’t quite as timid about hiding references, because being able to manipulate them a bit more directly turns out to be very useful for writing quick, clean code, in particular for conserving memory and dealing with state intelligently.

References in Perl

In Perl, you have three basic data types; scalars, arrays, and hashes. These all use different identifiers; Scalars use $, arrays use @, and hashes use %.

my $string = "string";
my $integer = 0;
my $float = 0.0;
my @array = (1,2,3);
my %hash = (name => "Tom Ryder",
            blog => "Arabesque");

So scalars can refer directly to data in the way you’re accustomed to in PHP, but they can also be references to any other kind of data. For example, you could write:

my $string = "string";
my $copy = $string;
my $reference = \$string;

The value of both $string and $copy, when printed, will be “string”, as you might expect. However, the $reference scalar becomes a reference to the data stored in $string, and when printed out would give something like SCALAR(0x2160718). Similarly, you can define a scalar as a reference to an array or hash:

my @array = (1,2,3);
my $arrayref = \@array;
my %hash = (name => "Tom Ryder",
            blog => "Arabesque");
my $hashref = \%hash;

There are even shorthands for doing this, if you want to declare a reference and the data it references inline. For array references, you use square brackets, and for hash references, curly brackets:

$arrayref = [1,2,3];
$hashref = {name => "Tom Ryder",
            blog => "Arabesque"};

And if you really do want to operate with the data of the reference, rather than the reference itself, you can explicitly dereference it:

$string = ${$reference};
@array = @{$arrayref};
%hash = %{$hashref};

For a much more in-depth discussion of how references work in Perl and their general usefulness, check out perlref in the Perl documentation.

Nagios on Debian primer

Nagios is useful for monitoring pretty much any kind of network service, with a wide variety of community-made plugins to test pretty much anything you might need. However, its configuration and interface can be a little bit cryptic to initiates. Fortunately, Nagios is well-packaged in Debian and Ubuntu and provides a basic default configuration that is instructive to read and extend.

There’s a reason that a lot of system administrators turn into monitoring fanatics when tools like Nagios are available. The rapid feedback of things going wrong and being fixed and the pleasant sea of green when all your services are up can get addictive for any halfway dedicated administrator.

In this article I’ll walk you through installing a very simple monitoring setup on a Debian or Ubuntu server. We’ll assume you have two computers in your home network, a workstation on 192.168.1.1 and a server on 192.168.1.2, and that you maintain a web service of some sort on a remote server, for which I’ll use www.example.com. We’ll install a Nagios instance on the server that monitors both local services and the remote webserver, and emails you if it detects any problems.

For those not running a Debian-based GNU/Linux distribution or perhaps BSD, much of the configuration here will still apply, but the initial setup will probably be peculiar to your ports or packaging system unless you’re compiling from source.

Installing the packages

We’ll work on a freshly installed Debian Stable box as the server, which at the time of writing is version 6.0.3 “Squeeze”. If you don’t have it working already, you should start by installing Apache HTTPD:

# apt-get install apache2

Visit the server on http://192.168.1.1/ and check that you get the “It works!”, and that should be all you need. Note that by default this installation of Apache is not terribly secure, so you shouldn’t allow access to it from outside your private network until you’ve locked it down a bit, which is outside the scope of this article.

Next we’ll install the nagios3 package, which will include a default set of useful plugins, and a simple configuration. The list of packages it needs to support these is quite long so you may need to install a lot of dependencies, which apt-get will manage for you.

# apt-get install nagios3

The installation procedure will include requesting a password for the administration area; provide it with a suitable one. You may also get prompted to configure a workgroup for the samba-common package; don’t worry, you aren’t installing a samba service by doing this, it’s just information for the smbclient program in case you want to monitor any SMB/CIFS services.

That should provide you with a basic self-monitoring Nagios setup. Visit http://192.168.1.1/nagios3/ in your browser to verify this; use the username nagiosadmin and the password you gave during the install process. If you see something like the below, you’re in business; this is the Nagios web reporting and administration panel.

The Nagios administration area's front page

The Nagios administration area's front page

Default setup

To start with, click the Services link in the left menu. You should see something like the below, which is the monitoring for localhost and the service monitoring that the packager set up for you by default:
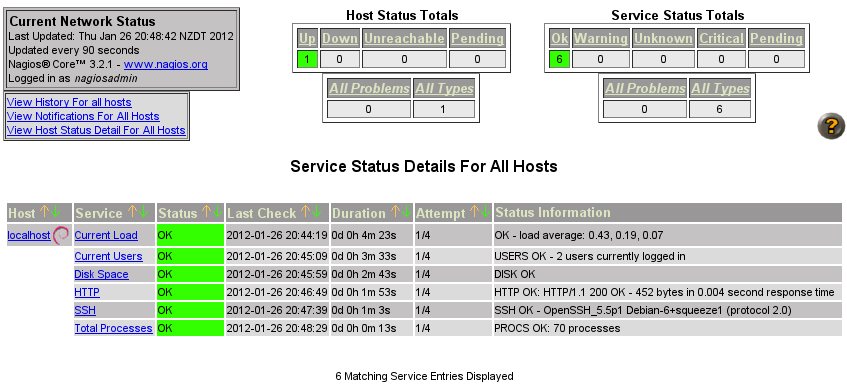
Default Nagios monitoring hosts and services

Default Nagios monitoring hosts and services

Note that on my system, monitoring for the already-existing HTTP and SSH daemons was automatically set up for me, along with the default checks for load average, user count, and process count. If any of these pass a threshold, they’ll turn yellow for WARNING, and red for CRITICAL states.

This is already somewhat useful, though a server monitoring itself is a bit problematic because of course it won’t be able to tell you if it goes completely down. So for the next step, we’re going to set up monitoring for the remote host www.example.com, which means firing up your favourite text editor to edit a few configuration files.

Default configuration

Nagios configuration is at first blush a bit complex, because monitoring setups need to be quite finely-tuned in order to be useful long term, particularly if you’re managing a large number of hosts. Take a look at the files in /etc/nagios3/conf.d.

# ls /etc/nagios3/conf.d
contacts_nagios2.cfg
extinfo_nagios2.cfg
generic-host_nagios2.cfg
generic-service_nagios2.cfg
hostgroups_nagios2.cfg
localhost_nagios2.cfg
services_nagios2.cfg
timeperiods_nagios2.cfg

You can actually arrange a Nagios configuration any way you like, including one big well-ordered file, but it makes some sense to break it up into sections if you can. In this case, the default setup includes the following files:

  • contacts_nagios2.cfg defines the people and groups of people who should receive notifications and alerts when Nagios detects problems or resolutions.
  • extinfo_nagios2.cfg makes some miscellaneous enhancements to other configurations, kept in a separate file for clarity.
  • generic-host_nagios2.cfg is Debian’s host template, defining a few common variables that you’re likely to want for most hosts, saving you repeating yourself when defining host definitions.
  • generic-service_nagios2.cfg is the same idea, but it’s a template service to monitor.
  • hostgroups_nagios2.cfg defines groups of hosts in case it’s valuable for you to monitor individual groups of hosts, which the Nagios admin allows you to do.
  • localhost_nagios2.cfg is where the monitoring for the localhost host we were just looking at is defined.
  • services_nagios2.cfg is where further services are defined that might be applied to groups.
  • timeperiods_nagios2.cfg defines periods of time for monitoring services; for example, you might want to get paged if a webserver dies 24/7, but you might not care as much about 5% packet loss on some international link at 2am on Saturday morning.

This isn’t my favourite method of organising Nagios configuration, but it’ll work fine for us. We’ll start by defining a remote host, and add services to it.

Testing services

First of all, let’s check we actually have connectivity to the host we’re monitoring from this server for both of the services we intend to check; ICMP ECHO (PING) and HTTP.

$ ping -n -c 1 www.example.com
PING www.example.com (192.0.43.10) 56(84) bytes of data.
64 bytes from 192.0.43.10: icmp_req=1 ttl=243 time=168 ms
--- www.example.com ping statistics --- 1 packets transmitted, 1 received,
0% packet loss, time 0ms rtt min/avg/max/mdev = 168.700/168.700/168.700/0.000 ms

$ wget www.example.com -O - | grep -i found
tom@novus:~$ wget www.example.com -O -
--2012-01-26 21:12:00--  http://www.example.com/
Resolving www.example.com... 192.0.43.10, 2001:500:88:200::10
Connecting to www.example.com|192.0.43.10|:80... connected.
HTTP request sent, awaiting response... 302 Found
...

All looks well, so we’ll go ahead and add the host and its services.

Defining the remote host

Write a new file in the /etc/nagios3/conf.d directory called www.example.com_nagios2.cfg, with the following contents:

define host {
    use        generic-host
    host_name  www.example.com
    address    www.example.com
}

The first stanza of localhost_nagios2.conf looks very similar to this, indeed, it uses the same host template, generic-host. All we need to do is define what to call the host, and where to find it.

However, in order to get it monitoring appropriate services, we might need to add it to one of the already existing groups. Open up hostgroups_nagios2.cfg, and look for the stanza that includes hostgroup_name http-servers. Add www.example.com to the group’s members, so that that stanza looks like this:

# A list of your web servers
define hostgroup {
    hostgroup_name  http-servers
    alias           HTTP servers
    members         localhost,www.example.com
}

With this done, you need to restart the Nagios process:

# service nagios3 restart

If that succeeds, you should notice under your Hosts and Services section is a new host called “www.example.com”, and it’s being monitored for HTTP. At first, it’ll be PENDING, but when the scheduled check runs, it should come back (hopefully!) as OK.

Example remote Nagios host and service

Example remote Nagios host and service

You can add other webhost monitoring the same way, by creating new hosts with appropriate addresses and adding them to the http-servers group.

Email notification

If you have a mail daemon running on your server like exim4 or postfix that’s capable of remote email delivery, you can edit contacts_nagios2.cfg and change root@localhost to your own email address. Restart Nagios again, and you should now receive an email alert each time a service goes up or down.

Further suggestions

This primer has barely scratched the surface of what you can do with Nagios. For further exercises, read the configuration files in a bit more depth, and see if you can get these working:

  • Set up an smtp-servers group, and add your ISP’s mail server to it so that you can monitor whether their SMTP process is up. Define the service for any host that’s in the group.
  • Add your private workstation to the hosts, but set it up so that it only notifies you if it goes down during working hours in your timezone.
  • [Advanced] Automatically post notifications to your system’s MOTD.

In a future article, I’ll be describing how to use the Map functionality of Nagios along with parent definitions to set up a very simple network weathermap.

I have now completed my first book, the Nagios Core Administration Cookbook, which takes readers beyond the basics of monitoring with Nagios Core. Give it a look if this sounds interesting!

Sahara Vim colorscheme

Not being too fussy about colorschemes in Vim, and spending much more time in terminals on various machines rather than being able to use a GUI wrapper with Vim for full color, I stuck with desert256 for quite some time because it was one of the defaults, worked pretty much everywhere, and looked sensible for most of the languages in which I write. I have found a few things that I wanted to change though, in particular completely removing the clunky color-approximation code that never quite worked right for me. I’m calling my fork Sahara.

Other changes include:

  • Most inactive or non-text regions are now in dark grey, including line numbers and window separators
  • Clearer indication of inactive and active windows with black and white status bar text respectively
  • Removed some unnecessary noise from HTML and PHP syntax highlighting with a couple of linked groups
  • Red, green, and blue backgrounds for removed, added, and changed sections in vimdiff
  • Monochrome tones for the autocompletion menu to replace the pretty horrifying defaults
  • Aqua for incremental search, deep blue for completed search highlighting

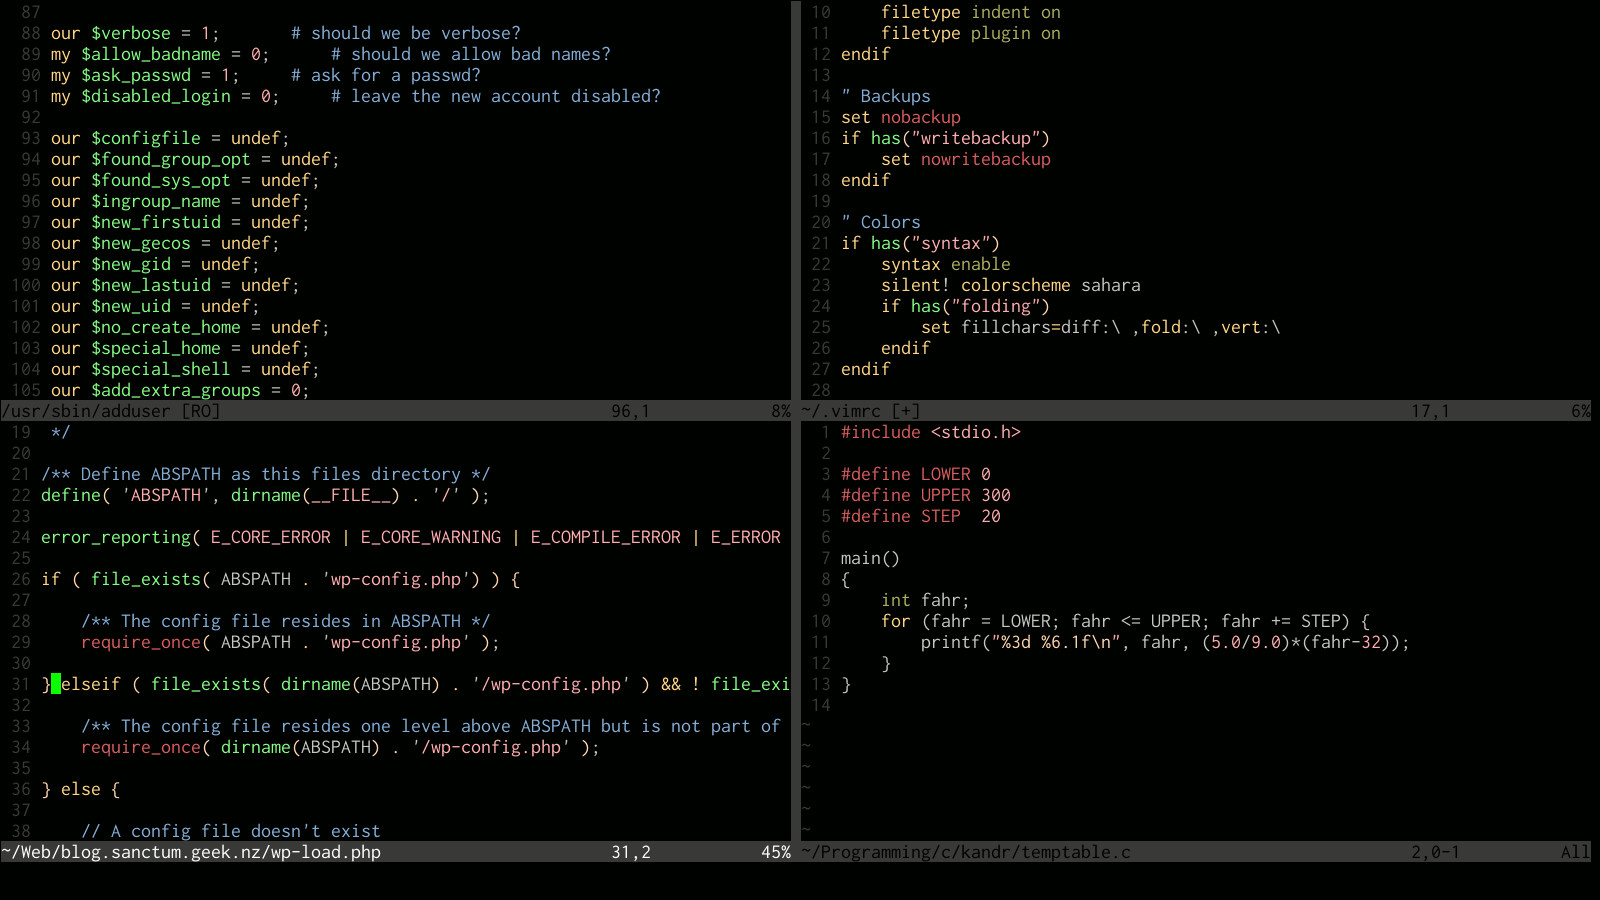
These are mostly pretty subtle changes, but if you use gVim or a 256-color terminal as well and you like the way desert256 works, this could possibly be of use to you. There’s a Git repository for it.

Screenshot using the Sahara colorscheme

Screenshot using the Sahara colorscheme

SSH tunnels and escapes

Quite apart from replacing Telnet and other insecure protocols as the primary means of choice for contacting and administrating services, the OpenSSH implementation of the SSH protocol has developed into a general-purpose toolbox for all kinds of well-secured communication, whether using both simple challenge-response authentication in the form of user and password logins, or for more complex public key authentication.

SSH is useful in a general sense for tunnelling pretty much any kind of TCP traffic, and doing so securely and with appropriate authentication. This can be used both for ad-hoc purposes such as talking to a process on a remote host that’s only listening locally or within a secured network, or for bypassing restrictive firewall rules, to more stable implementations such as setting up a persistent SSH tunnel between two machines to ensure sensitive traffic that might otherwise be sent in cleartext is not only encrypted but authenticated. I’ll discuss a couple of simple examples here, in addition to talking about the SSH escape sequences, about which I don’t seem to have seen very much information online.

SSH tunnelling for port forwarding

Suppose you’re at work or on a client site and you need some information off a webserver on your network at home, perhaps a private wiki you run, or a bug tracker or version control repository. This being private information, and your HTTP daemon perhaps not the most secure in the world, the server only listens on its local address of 192.168.1.1, and HTTP traffic is not allowed through your firewall anyway. However, SSH traffic is, so all you need to do is set up a tunnel to port forward a local port on your client machine to a local port on the remote machine. Assuming your SSH-accessible firewall was listening on firewall.yourdomain.com, one possible syntax would be:

$ ssh user@firewall.yourdomain.com -L5080:192.168.1.1:80

If you then pointed your browser to localhost:5080, your traffic would be transparently tunnelled to your webserver by your firewall, and you could act more or less as if you were actually at home on your office network with the webserver happily trusting all of your requests. This will work as long as the SSH session is open, and there are means to background it instead if you prefer — see man ssh and look for the -f and -N options. As you can see by the use of the 192.168.1.1 address here, this also works through NAT.

This can work in reverse, too; if you need to be able to access a service on your local network that might be behind a restrictive firewall from a remote machine, a perhaps less typical but still useful case, you could set up a tunnel to listen for SSH connections on the network you’re on from your remote firewall:

$ ssh user@firewall.yourdomain.com -R5022:localhost:22 -f -N

As long as this TCP session stays active on the machine, you’ll be able to point an SSH client on your firewall to localhost on port 5022, and it will open an SSH session as normal:

$ ssh localhost -p 5022

I have used this as an ad-hoc VPN back into a remote site when the established VPN system was being replaced, and it worked very well. With appropriate settings for sshd, you can even allow other machines on that network to use the forward through the firewall, by allowing GatewayPorts and providing a bind_address to the SSH invocation. This is also in the manual.

SSH’s practicality and transparency in this regard has meant it’s quite typical for advanced or particularly cautious administrators to make the SSH daemon the only process on appropriate servers that listens on a network interface other than localhost, or as the only port left open on a private network firewall, since an available SSH service proffers full connectivity for any legitimate user with a basic knowledge of SSH tunnelling anyway. This has the added bonus of transparent encryption when working on any sort of insecure network. This would be a necessity, for example, if you needed to pass sensitive information to another network while on a public WiFi network at a café or library; it’s the same rationale for using HTTPS rather than HTTP wherever possible on public networks.

Escape sequences

If you use these often, however, you’ll probably find it’s a bit inconvenient to be working on a remote machine through an SSH session, and then have to start a new SSH session or restart your current one just to forward a local port to some resource that you discovered you need on the remote machine. Fortunately, the OpenSSH client provides a shortcut in the form of its escape sequence, ~C.

Typed on its own at a fresh Bash prompt in an ssh session, before any other character has been inserted or deleted, this will drop you to an ssh> prompt. You can type ? and press Enter here to get a list of the commands available:

$ ~C
ssh> ?
Commands:
    -L[bind_address:]port:host:hostport  Request local forward
    -R[bind_address:]port:host:hostport  Request remote forward
    -D[bind_address:]port                Request dynamic forward
    -KR[bind_address:]port               Cancel remote forward

The syntax for the -L and -R commands is the same as when used as a parameter for SSH. So to return to our earlier example, if you had an established SSH session to the firewall of your local network, to forward a port you could drop to the ssh> prompt and type -L5080:localhost:80 to get the same port forward rule working.

Vim command typos

I very often “fat-finger” some of the most common commands in Vim by holding down Shift too long after typing a colon. This means that instead of typing :w I end up typing :W, or :Qa instead of :qa, and because I use these commands so often, I type them so rapidly and reflexively that mistakes become quite common.

Since the uppercase versions of these oft-mistyped commands don’t actually correspond to any other valid command, I considered it safe to map them so that it would quietly accept this common mistake from me and understand what I actually meant to do. I did this with the following lines in my .vimrc:

if has("user_commands")
    command! -bang -nargs=? -complete=file E e<bang> <args>
    command! -bang -nargs=? -complete=file W w<bang> <args>
    command! -bang -nargs=? -complete=file Wq wq<bang> <args>
    command! -bang -nargs=? -complete=file WQ wq<bang> <args>
    command! -bang Wa wa<bang>
    command! -bang WA wa<bang>
    command! -bang Q q<bang>
    command! -bang QA qa<bang>
    command! -bang Qa qa<bang>
endif

Note the -bang and <bang> parts of each line; this allows me to include an exclamation mark in my mistyped command to force the command if a buffer is unsaved, which otherwise wouldn’t work. Additionally, I use command! with an exclamation mark to prevent errors if I reload my .vimrc file having already loaded it once. Finally, the first four commands, which can optionally take an argument, are set up to do that in their capitalised form as well.

You can list these commands and any others you or your plugins have defined by typing just :command by itself. Check out :help command for a bit more information on mapping commands in this manner.

The wrong way

This is quite different from the approach I often see recommended to work around this problem, which is using cnoreabbrev like so:

cnoreabbrev W w
cnoreabbrev Q q

I think this is a pretty bad idea because if I wanted to search for a single uppercase Q or W, it gets automatically mapped back to its lowercase equivalent in the search window. When I tried these mappings out I noticed this very quickly, and because I use case-sensitive search it rapidly got very frustrating. I am much happier with the solution I describe above, and particularly recommend it if like myself you prefer to keep ignorecase off.

Remapping for a different approach

If you don’t mind a slightly more drastic remapping, you could use another character that doesn’t require holding Shift to initiate commands, such as a semicolon, which means you won’t accidentally capitalise these common commands anymore:

nnoremap ; :

I don’t like this solution either, because the semicolon already has a function in repeating the linewise character searches you can do with f, t, F, and T, but I have seen it in several other people’s .vimrc files.

High-speed Bash

One of my favourite technical presentations I’ve read online has been Hal Pomeranz’s Unix Command-Line Kung Fu, a catalogue of shortcuts and efficient methods of doing very clever things with the Bash shell. None of these are grand arcane secrets, but they’re things that are often forgotten in the course of daily admin work, when you find yourself typing something you needn’t, or pressing up repeatedly to find something you wrote for which you could simply search your command history.

I highly recommend reading the whole thing, as I think even the most experienced shell users will find there are useful tidbits in there that would make their lives easier and their time with the shell more productive, beyond simpler things like tab completion. Here, I’ll recap two of the things I thought were the most simple and useful items in the presentation for general shell usage, and see if I can add a little value to them with reference to the Bash manual.

History with Ctrl+R

For many shell users, finding a command in history means either pressing the up arrow key repeatedly, or perhaps piping a history call through grep. It turns out there’s a much nicer way to do this, using Bash’s built-in history searching functionality; if you press Ctrl+R and start typing a search pattern, the most recent command matching that pattern will automatically be inserted on your current line, at which point you can adapt it as you need, or simply press Enter to run it again. You can keep pressing Ctrl+R to move further back in your history to the next-most recent match. On my shell, if I search through my history for git, I can pull up what I typed for a previous commit:

(reverse-i-search)`git': git commit -am "Pulled up-to-date colors."

This functionality isn’t actually exclusive to Bash; you can establish a history search function in quite a few tools that use GNU Readline, including the MySQL client command line.

You can search forward through history in the same way with Ctrl+S, but it’s likely you’ll have to fix up a couple of terminal annoyances first.

Additionally, if like me you’re a Vim user and you don’t really like having to reach for the arrow keys, or if you’re on a terminal where those keys are broken for whatever reason, you can browse back and forth within your command history with Ctrl+P (previous) and Ctrl+N (next). These are just a few of the Emacs-style shortcuts that GNU Readline provides; check here for a more complete list.

Repeating commands with !!

The last command you ran in Bash can be abbreviated on the next line with two exclamation marks:

$ echo "Testing."
Testing.
$ !!
Testing.

You can use this to simply repeat a command over and over again, although for that you really should be using watch, but more interestingly it turns out this is very handy for building complex pipes in stages. Suppose you were building a pipeline to digest some data generated from a program like netstat, perhaps to determine the top 10 IP addresses that are holding open the most connections to a server. You might be able to build a pipeline like this:

# netstat -ant
# !! | awk '{print $5}'
# !! | sort
# !! | uniq -c
# !! | sort -rn
# !! | sed 10q

Similarly, you can repeat the last argument from the previous command line using !$, which is useful if you’re doing a set of operations on one file, such as checking it out via RCS, editing it, and checking it back in:

$ co -l file.txt
$ vim !$
$ ci -u !$

Or if you happen to want to work on a set of arguments, you can repeat all of the arguments from the previous command using !*:

$ touch a.txt b.txt c.txt
$ rm !*

When you remember to user these three together, they can save you a lot of typing, and will really increase your accuracy because you won’t be at risk of mistyping any of the commands or arguments. Naturally, however, it pays to be careful what you’re running through rm!

Managing dot files with Git

Managing configuration files in your home directory on a POSIX system can be a pain when you often work on more than one machine, or when you accidentally remove or delete some useful option or file. It turns out that it’s beneficial to manage your configuration files via a version control system, which will allow you both to track the changes you make, and also to easily implement them on other machines. In this case, I’m going to show you how to do it with Git, but in principle there’s no reason most of this couldn’t work with Subversion or Mercurial.

Choosing which files to version

A good way to start is to take a look at the dot files and dot directories you have storing your carefully crafted configurations, and figure out for which of them it would be most important to track changes and to be able to rapidly deploy on remote systems. I use the following criteria:

  • Compatibility: Is the configuration likely to work on all or most of the systems on which you’re going to use it? If you’re going to check out your cutting edge .vimrc file on a remote Debian Sarge machine that hasn’t been updated since 2006, you might find that a lot of it doesn’t work properly. In some cases, you can add conditionals to configuration files so that they only load the option if it’s actually available. Similarly, you might not want to copy your .bashrc to all of your machines if you use a wide variety of them.
  • Transferability: Are you going to want exactly the same behaviour this file configures on all of your remote systems? If your .gitconfig file includes a personal handle or outside e-mail address, it might not be appropriate for you to clone that onto your work servers, since it’ll end up in commits you do from work.
  • Mutability: Are you going to be the only agent that updates this configuration, or will programs change it as well, for example to store cached file references? This can make updating a pain.
  • Privacy: If you’re going to put the file on GitHub or any other public repository service, does it contain private information? You probably shouldn’t put anything with API keys, SSH keys, or database credentials out in the ether.

With these criteria applied, it turns out there are configurations for three programs that I really want to be able to maintain easily across servers: my Vim configuration, my Git configuration, and my GNU Screen configuration.

Creating the repository

To start, we’ll create a directory called .dotfiles to hold all our configuration, and initialise it as an empty Git repository.

$ mkdir .dotfiles
$ cd .dotfiles
$ git init

Then we’ll copy in the configuration files we want to track, and drop symbolic links to them from where they used to be, so that the applications concerned read them correctly.

$ cd
$ mv .vim .dotfiles/vim
$ mv .vimrc .dotfiles/vimrc
$ mv .screenrc .dotfiles/screenrc
$ mv .gitconfig .dotfiles/gitconfig
$ ln -s .dotfiles/vim .vim
$ ln -s .dotfiles/vimrc .vimrc
$ ln -s .dotfiles/screenrc .screenrc
$ ln -s .dotfiles/gitconfig .gitconfig

Next, we drop into the .dotfiles directory, add everything to the staging area, and commit it:

$ cd .dotfiles
$ git add *
$ git commit -m "First commit of dotfiles."

And that’s it, we’ve now got all four of those files tracked in our local Git repository.

Using a remote repository

With that done, if you want to take the next step of having a central location where you can always get your configuration from any machine with an internet connection, you can set up a repository for your dot files on GitHub, with a free account. The instructions for doing this on GitHub itself are great, so just follow them for your existing repository. On my machine, the results look like this:

$ git remote add origin git@github.com:tejr/dotfiles.git
$ git push -u origin master

Note that I’m pushing using a public key setup, which you can arrange in the SSH Public Keys section of your GitHub account settings.

With this done, if you update your configuration at any time, first add and commit the changes to your local repository, and then all you need to do to update the GitHub version as well is:

$ git push

Cloning onto another machine

Having done this, when you’re working with a new machine onto which you’d like to clone your configuration, you clone the repository from GitHub, and delete any existing versions of those files in your home directory to replace them with symbolic links into your repository, like so:

$ git clone git@github.com:tejr/dotfiles.git .dotfiles
$ rm -r .vim .vimrc .screenrc .gitconfig
$ ln -s .dotfiles/vim .vim
$ ln -s .dotfiles/vimrc .vimrc
$ ln -s .dotfiles/screenrc .screenrc
$ ln -s .dotfiles/gitconfig .gitconfig

Finally, if you come back to use this machine later after you’ve tweaked these configuration files a bit and pushed them to GitHub, you can update them by just running a pull:

$ git pull

Making things easier

This ends up taking a lot of annoyances out of my day, as I know on any machine on which I frequently work, all I need to do is drop to my .dotfiles directory and run a git pull to get the most recent version of my configurations. This ends up being a lot better than manually running scp or rsync calls to keep things up to date.

Useless use of cat

If you’re reasonably confident with using pipes and redirection to build command-line strings in Bash and similar shells, at some point somebody is going to tell you off for a “useless use of cat“. This means that somewhere in your script or pipeline, you’ve used the cat command unnecessarily.

Here’s a simple example of such a use of cat; here, I’m running an Apache log through a pipe to awk to get a list of all the IP addresses that have accessed the server.

# cat /var/log/apache2/access.log | awk '{print $1}'

That works just fine, but I don’t actually need the cat instance there. Instead, I can supply a file argument directly to awk, and the result will be the same, with one less process spawned as a result:

# awk '{print $1}' /var/log/apache2/access.log

Most of the standard UNIX command-line tools designed for filtering text actually work like this; like me, you probably already knew that, but fell into the habit of using cat anyway.

For tools that don’t take a filename instead of standard input, such as mail, you can explicitly specify that a file’s contents should be used as the standard input stream. Consider this line, where I’m mailing a copy of my Apache configuration to myself:

# cat /etc/apache2/apache2.conf | mail tom@sanctum.geek.nz

That works fine, but we can compact it using < as a redirection symbol for the same result, and a command line a whole five characters shorter:

# mail tom@sanctum.geek.nz </etc/apache2/apache2.conf

If you overuse cat, then these two methods will probably enable you to fix that with a little effort. Incidentally, the second method can also be extended to provide in-place arguments for tools that read from files, by adding parentheses. Here, for example, I’m comparing the difference in output when I run grep with two different flags on the same file, using diff:

# diff -u <(grep -E '(a|b)' file.txt) <(grep -F '(a|b)' file.txt)