About Tom Ryder

sysadmin, dev, writer, IRC nuisance. vi/vim/vimself

User cron tasks

If you’ve used POSIX-friendly systems like GNU/Linux or BSD for a while, you’ll be familiar with the use of the /etc/crontab file, which defines scheduled tasks. You’ll probably be used to editing this file simply by invoking it in your editor.

However, there’s also a crontab binary that’s expressly designed for users with appropriate permissions to run their own scheduled tasks. The files are created, edited, listed, and removed through calls to this binary with the appropriate options, and stored in /var/spool/cron/crontabs.

You can edit the contents of your personal crontab on a machine like so:

$ crontab -e

That will bring up a crontab file in your chosen EDITOR. If you haven’t created one yet, it’ll be empty, possibly with a template for you to edit including explanatory notes in comments.

The syntax is the same as for the system /etc/crontab and /etc/cron.d/* files, except that the field for the username is excluded.

Saving this file in your editor and quitting will instate it as your personal crontab.

You can print the contents of the file thus:

$ crontab -l

And if you no longer need it, it can be erased:

$ crontab -r

I find this is useful for running git pull -q on my dotfiles repository, to automatically keep my configuration files up to date across systems. This one runs at midnight every day:

$ crontab -l
0 0 * * * cd ~/.dotfiles && git pull -q

Vim anti-patterns

The benefits of getting to grips with Vim are immense in terms of editing speed and maintaining your “flow” when you’re on a roll, whether writing code, poetry, or prose, but because the learning curve is so steep for a text editor, it’s very easy to retain habits from your time learning the editor that stick with you well into mastery. Because Vim makes you so fast and fluent, it’s especially hard to root these out because you might not even notice them, but it’s worth it. Here I’ll list some of the more common ones.

Moving one line at a time

If you have to move more than a couple of lines, moving one line at a time by holding down j or k is inefficient. There are many more ways to move vertically in Vim. I find that the two most useful are moving by paragraph and by screenful, but this depends on how far and how precisely you have to move.

  • { — Move to start of previous paragraph or code block.
  • } — Move to end of next paragraph or code block.
  • Ctrl+F — Move forward one screenful.
  • Ctrl+B — Move backward one screenful.

If you happen to know precisely where you want to go, navigating by searching is the way to go, searching forward with / and backward with ?.

It’s always useful to jump back to where you were, as well, which is easily enough done with two backticks, or gi to go to the last place you inserted text. If you like, you can even go back and forth through your entire change list of positions with g; and g,.

Moving one character at a time

Similarly, moving one character at a time with h and l is often a waste when you have t and f:

  • t<char> — Move forward until the next occurrence of the character.
  • f<char> — Move forward over the next occurrence of the character.
  • T<char> — Move backward until the previous occurrence of the character.
  • F<char> — Move backward over the previous occurrence of the character.

Moving wordwise with w, W, b, B, e, and E is better, too. Again, searching to navigate is good here, and don’t forget you can yankdelete or change forward or backward to a search result:

y/search<Enter>
y?search<Enter>
d/search<Enter>
d?search<Enter>
c/search<Enter>
c?search<Enter>

Searching for the word under the cursor

Don’t bother typing it, or yanking/pasting it; just use * or #. It’s dizzying how much faster this feels when you use it enough for it to become automatic.

Deleting, then inserting

Deleting text with intent to replace it by entering insert mode immediately afterward isn’t necessary:

d2wi

It’s quicker and tidier to use c for change:

c2w

This has the added benefit of making the entire operation repeatable with the . command.

Using the arrow keys

Vim lets you use the arrow keys to move around in both insert and normal mode, but once you’re used to using hjkl to navigate, moving to the arrow keys to move around in text feels clumsy; you should be able to spend the vast majority of a Vim session with your hands firmly centered around home row. Similarly, while the Home and End keys work the same way they do in most editors, there’s no particular reason to use them when functional equivalents are closer to home in ^ and $.

So wean yourself off the arrow keys, by the simple expedient of disabling them entirely, at least temporarily:

noremap <Up> <nop>
noremap <Down> <nop>
noremap <Left> <nop>
noremap <Right> <nop>

The benefits of sticking to home row aren’t simply in speed; it feels nicer to be able to rest your wrists in front of the keyboard and not have to move them too far, and for some people it has even helped prevent repetitive strain injury.

Moving in insert mode

There’s an additional benefit to the above in that it will ease you into thinking less about insert mode as a mode in which you move around; that’s what normal mode is for. You should, in general, spend as little time in insert mode as possible. When you want to move, you’ll get in the habit of leaving insert mode, and moving around far more efficiently in normal mode instead. This distinction also helps to keep your insert operations more atomic, and hence more useful to repeat.

Moving to Escape

The Escape key on modern keyboards is a lot further from home row than it was on Bill Joy’s keyboard back when he designed vi. Hitting Escape is usually unnecessary; Ctrl+[ is a lot closer, and more comfortable. It doesn’t take long using this combination instead to make reaching for Escape as you did when you were a newbie feel very awkward. You might also consider mapping the otherwise pretty useless Caps Lock key to be another Escape key in your operating system, or even mapping uncommon key combinations like jj to Escape. I feel this is a bit drastic, but it works well for a lot of people:

inoremap jj <Esc>

Moving to the start or end of the line, then inserting

Just use I and A. Again, these make the action repeatable for other lines which might need the same operation.

Entering insert mode, then opening a new line

Just use o and O to open a new line below and above respectively, and enter insert mode on it at the same time.

Entering insert mode to delete text

This is a pretty obvious contradiction. Instead, delete the text by moving to it and using d with an appropriate motion or text object. Again, this is repeatable, and means you’re not holding down Backspace. In general, if you’re holding down a key in Vim, there’s probably a faster way.

Repeating commands or searches

Just type @: for commands or n/N for searches; Vim doesn’t forget what your last search was as soon as you stop flicking through results. If it wasn’t your most recent command or search but it’s definitely in your history, just type q: or q/, find it in the list, and hit Enter.

Repeating substitutions

Just type & to repeat the last substitution on the current line. You can repeat it on all lines by typing g&.

Repeating macro calls

Just type @@.

These are really only just a few of the common traps to avoid to increase your speed and general efficiency with the editor without requiring plugins or substantial remappings. Check out the Vim Tips wiki for some other really helpful examples.
Elegant Awk usage

For many system administrators, Awk is used only as a way to print specific columns of data from programs that generate columnar output, such as netstat or ps. For example, to get a list of all the IP addresses and ports with open TCP connections on a machine, one might run the following:

# netstat -ant | awk '{print $5}'

This works pretty well, but among the data you actually wanted it also includes the fifth word of the opening explanatory note, and the heading of the fifth column:

and
Address
0.0.0.0:*
205.188.17.70:443
172.20.0.236:5222
72.14.203.125:5222

There are varying ways to deal with this.

Matching patterns

One common way is to pipe the output further through a call to grep, perhaps to only include results with at least one number:

# netstat -ant | awk '{print $5}' | grep '[0-9]'

In this case, it’s instructive to use the awk call a bit more intelligently by setting a regular expression which the applicable line must match in order for that field to be printed, with the standard / characters as delimiters. This eliminates the need for the call to grep:

# netstat -ant | awk '/[0-9]/ {print $5}'

We can further refine this by ensuring that the regular expression should only match data in the fifth column of the output, using the ~ operator:

# netstat -ant | awk '$5 ~ /[0-9]/ {print $5}'

Skipping lines

Another approach you could take to strip the headers out might be to use sed to skip the first two lines of the output:

# netstat -ant | awk '{print $5}' | sed 1,2d

However, this can also be incorporated into the awk call, using the NR variable and making it part of a conditional checking the line number is greater than two:

# netstat -ant | awk 'NR>2 {print $5}'

Combining and excluding patterns

Another common idiom on systems that don’t have the special pgrep command is to filter ps output for a string, but exclude the grep process itself from the output with grep -v grep:

# ps -ef | grep apache | grep -v grep | awk '{print $2}'

If you’re using Awk to get columnar data from the output, in this case the second column containing the process ID, both calls to grep can instead be incorporated into the awk call:

# ps -ef | awk '/apache/ && !/awk/ {print $2}'

Again, this can be further refined if necessary to ensure you’re only matching the expressions against the command name by specifying the field number for each comparison:

# ps -ef | awk '$8 ~ /apache/ && $8 !~ /awk/ {print $2}'

If you’re used to using Awk purely as a column filter, the above might help to increase its utility for you and allow you to write shorter and more efficient command lines. The Awk Primer on Wikibooks is a really good reference for using Awk to its fullest for the sorts of tasks for which it’s especially well-suited.

Vim command window

The command line in Vim for ex commands can be edited with a few of the GNU Readline key combinations that may be familiar to Bash or Emacs users, so it’s reasonably easy to edit it, for example to type in complex search patterns and replacements.

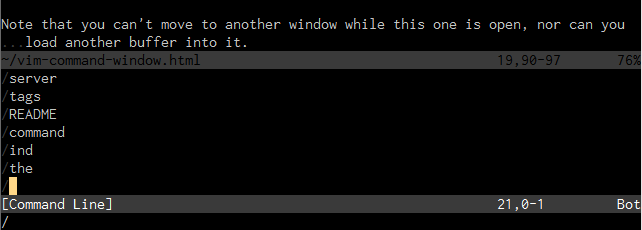
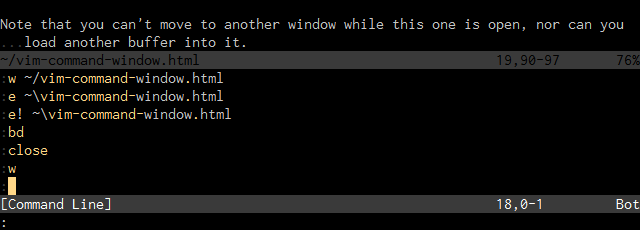
However, if you want the full facility of Vim editing for your commands, it can be helpful to use Vim’s command line window, which will allow you to enter commands and edit previous ones with the usual normal and insert mode.

You can open the command line window from normal mode in one of four ways:

  • q: — Open with a command history from normal mode
  • q/ — Open with a search history from normal mode (to search forward)
  • q? — Open with a search history from normal mode (to search backward)
  • Ctrl+F — Open with a command history from command mode

Note that this doesn’t work while you’re recording macros, since pressing q stops the recording.

The window is always immediately above the status bar, and its height can be set via the cmdwinheight option.

Command line window

Once the command line window is opened with q:, you can browse through it and press Enter on any line to issue the same command again. You can also edit it beforehand, perhaps to fix a mistyped command. The window will close when this is done, but you can close it with Ctrl+W, C the same as any other window if you change your mind.

Vim command line window

Vim command line window

Note that you can’t move to another window while this one is open, nor can you load another buffer into it.

Search window

Similar to the above, if you open the command window with q/ or q?, it shows a history of your searches, and pressing enter on any line will issue the same again, in the appropriate direction.

Vim search window

Vim search window

For more information on how the command window works, check out :help command-line-window.

Bash shell expansion

Operations in the shell very often involve repeating yourself or working with sets or ranges of information. This is where the various kinds of expansion in the shell are most useful, for generating a large number of shell tokens using a compact syntax. I’ll discuss two types here: filename expansions, which will be familiar to most shell users; and brace expansions, which seem to be in less common usage.

Filename expansions (globs)

The most commonly seen type of filename expansion in Bash is the * wildcard, which can be used to match lists of files in any directory, whether through complete listings or partial matches:

$ ls *
a.txt b.txt c.txt d.txt extra.txt README install.sh
$ ls *.txt
a.txt b.txt c.txt d.txt extra.txt

However, there are two other types of filename expansions. Firstly, you can match single characters rather than ranges of characters with a question mark:

$ ls ?.txt
a.txt b.txt c.txt d.txt

You can further restrict this by matching only a single character in a specified group of characters, or within a range:

$ ls [ac].txt
a.txt c.txt
$ ls [a-c].txt
a.txt b.txt c.txt

These can be useful in very large directories to only view files starting with a nominated letter or number, or range of letters or numbers.

Brace expansion

Brace expansion is a little different, as it generates shell tokens that don’t necessarily correspond to existing files. This allows you to expand a single general form into a lot of space-delimited specific tokens. This is probably best explained with examples. First of all, you can define the expansions you want with comma separation:

$ echo example{test,show,define,declare}
exampletest exampleshow exampledefine exampledeclare

If you’re dealing with sequences of numbers or letters, there’s also the .. separator syntax for ranges:

$ echo example{a..d}
examplea exampleb examplec exampled
$ echo example{1..5}
example1 example2 example3 example4 example5

This can be useful for creating, renaming, copying, or moving files:

$ touch file.txt.{1..6}
$ mv file.{txt,html}
$ cp file.txt{,.bak}
$ mv website.co.nz/{testing,production}/index.php

I also find it useful when dealing with long paths in Subversion branching and merging:

$ svn copy svn://server/project/{trunk,branches/experimental}
$ svn merge svn://server/project/{branches/experimental,trunk} .

You can also combine and even nest these expansions, which makes it useful for creating directory trees for new projects or chroot environments:

$ mkdir -p {test,prod}/{,usr/,usr/local/}{{,s}bin,etc,lib,share}

The above rather compact syntax creates all of the following directories:

test
test/bin
test/etc
test/sbin
test/lib
test/usr
test/usr/bin
test/usr/etc
test/usr/sbin
test/usr/lib
test/usr/share
test/usr/local
test/usr/local/bin
test/usr/local/etc
test/usr/local/sbin
test/usr/local/lib
test/usr/local/share
test/share
prod
prod/bin
prod/etc
prod/sbin
prod/lib
prod/usr
prod/usr/bin
prod/usr/etc
prod/usr/sbin
prod/usr/lib
prod/usr/share
prod/usr/local
prod/usr/local/bin
prod/usr/local/etc
prod/usr/local/sbin
prod/usr/local/lib
prod/usr/local/share
prod/share

Thanks to Reddit user silvermoot for corrections/suggestions.

Subversion via Git

Subversion is a lot better than no version control system at all, but for those accustomed to distributed version control systems like Git or Mercurial, it can be pretty painful to lose features like cheap and flexible branching, intelligent merging and rebasing, and the snappy operations of Git when the need arises to work on code in a Subversion repository, perhaps for a legacy project or for an organisation with established repositories.

Fortunately, there’s an excellent compromise available in using the git-svn wrapper, which allows you to treat a Git repository as a working copy of a Subversion repository. This works transparently, meaning that others using the regular svn client on your team won’t have any difficulty working with your commits or branches, but your private Git workflow can meanwhile be as simple or complex as you like.

Installing

If you’re on Debian or Ubuntu, you can install the git-svn wrapper with:

# apt-get install git-svn

If you’re installing Git from source, it’s included in the default installation.

Cloning (Checkout)

To check out a copy of the trunk of the repository, you can clone it directly:

$ git svn clone svn://server.network/project/trunk project

This will provide you with a working copy of the repository’s trunk in the form of a Git repository, complete with a git log history imported from the Subversion commits. If you want to include tracking for the repository’s branches and tags as well, you can specify the paths to them on the command line:

$ git svn clone svn://server.network/project project \
    --trunk trunk --branches branches --tags tags

Typing git branch and git tag in the resulting repository will then show these as available branches and tags, as if they’d been created in Git. If the Subversion repository has a standard layout of folders, with branches, tags, and trunk, you can pass the --stdlayout or -s as a shortcut for the above:

$ git svn clone svn://server.network/project project --stdlayout

Fetching (Updating)

To pull the most recent changes from the Subversion repository into your Git “working copy”, use:

$ git svn fetch

If you have local changes in your repository that have not yet been committed, you may be prompted to temporarily cache them while you run the fetch operation. Git’s stash function works well for this:

$ git stash
$ git svn fetch
$ git stash apply

Committing

You can commit to your Git repository as normal with git commit. When you’re ready to send these commits to the Subversion repository, you can do so with:

$ git svn dcommit

This will also note information about the Subversion commit in the output of git log.

Branching

If you want to create a new branch in Git that tracks a similarly created branch in the Subversion repository, you can do this:

$ git svn branch experimental

It’s useful to note that if you don’t have any need to add the branch you’re creating to the Subversion repository, you can just use the usual git branch to keep a branch restricted to your Git repository. You should only need the git svn branch facility if others might need to use that branch before you merge it.

Merging

While it may be possible to conduct merges within the Subversion repository from the git-svn client, I think this particular task is probably best done using the usual svn merge tool. If you’re up to reading how this works in man git-svn, you should go for it, but I don’t think that getting a handle on the complexity of the rules for how these merges are run is really worth the effort in most cases, and given how brittle Subversion can be it’s likely not worth the risk of breaking things.

Properties

Aside from the above recommendation about using the native svn merge to conduct merges of Subversion branches, another limitation of the git-svn client is it ignores Subversion properties like the very useful svn:ignore, and furthermore doesn’t provide any way to set them. As a result, after the clone Git won’t know which file patterns a traditional Subversion working copy would be set up to ignore. You can emulate this by writing the properties file to a .gitignore or the .git/info/exclude files:

$ git svn show-ignore >> .gitignore
$ git svn show-ignore >> .git/info/exclude

Empty directories

Finally, Subversion and Git differ in how they treat empty directories. As a result, you may create an empty directory in a Git repository with intent to commit it into the Subversion repository, and find yourself unable to do so. The workaround here is to place some sort of file into the directory and commit that; a README file explaining the directory’s purpose seems to be a sensible choice.

These limitations, among others, show that the mapping from Subversion’s functionality to Git’s isn’t perfect, but for those who find working with Subversion a bit painful or imprecise, the functionality available in git-svn can certainly help, until such time as you’re able to convince your repository’s host to migrate everything to a more modern and capable revision control system.

Safely editing as root

Certain files on a UNIX-like system, such as /etc/passwd and /etc/sudoers, are integral for managing login and authentication, and it’s thus necessary to be very careful while editing them using sudo not to accidentally leave them in a corrupted state, or to allow others to edit them at the same time as you. In the worst case scenario it’s possible to lock yourself out of a system or out of root privileges in doing this, and things can only be fixed via physical access to the server or someone who knows the actual root password, which you may not necessarily know as a sudo user.

You should therefore never edit /etc/passwd, /etc/group, or /etc/sudoers by simply invoking them in your editor of choice. A set of simple utilities exist to help you make these edits safely.

vipw and vigr

If you want to safely edit the /etc/passwd file, for which you’ll need to have root privileges, you should use the vipw tool. It doesn’t require an argument.

# vipw

This will load a temporary copy of the file into your $EDITOR, and allow you to make changes. If all is well after you save and quit, you’ll see a message like:

You have modified /etc/passwd.
You may need to modify /etc/shadow for consistency.
Please use the command 'vipw -s' to do so.

If you’ve made changes which might require changing something in the /etc/shadow file, you should follow these instructions too.

The command to edit groups, vigr, works in much the same way:

# vigr

visudo

The analogous tool for editing the /etc/sudoers file is visudo. This file not only does the necessary lock and file corruption checking as vipw does, it also does some basic checking of the syntax of the file after you save it.

# visudo

If the changes you make to this file work correctly, you’ll simply be returned to your prompt. However, if you’ve made some sort of edit that means sudo won’t be able to correctly parse the file, you’ll get warned and prompted for an appropriate action:

visudo: >>> /etc/sudoers: syntax error near line 28 <<<
visudo: >>> /etc/sudoers: syntax error near line 29 <<<
What now?

If you press ? here and then Enter, you’ll get a list of the actions you can take:

Options are:
(e)dit sudoers file again
e(x)it without saving changes to sudoers file
(Q)uit and save changes to sudoers file (DANGER!)

You’ll probably want the first one, to edit your changes again and make them work properly, but you may want to hose them and start again via the second option. You should only choose the third if you absolutely know what you’re doing.

sudoedit

In general, you can edit root-owned files using sudoedit, or sudo -e, which will operate on temporary copies of the file and overwrite the original if changes are detected:

$ sudo -e /etc/network/interfaces

This has the added bonus of preserving all of your environment variables for the editing session, which may not be the case when invoking an editor and file via sudo. This turns out to be handy for newer versions of sudo which do not preserve the user’s $HOME directory by default, meaning that configuration files for your editor, such as .vimrc, might not be read.

Vim filename completion

The autocompletion for filenames in Vim in command mode is very useful, but by default it’s a bit confusing for people accustomed to tab completion in Bash because it doesn’t quite work the same way. Pressing Tab will complete the filename to the first match, and subsequent presses will not elicit any list of possible completions that might otherwise be expected; for that, by default you need to press Ctrl+D rather than Tab.

Tab then tab

Fortunately, this is easily changed by using Vim’s wildmenu, in an appropriate mode. Set the following options in your .vimrc:

set wildmenu
set wildmode=longest,list

You should now find that when you complete filenames after commands like :w and :e, the paths expand in a similar manner to the way they do in the shell. If you’d prefer to only press Tab once to get both the longest matching unique string and a list of possible complete matches, that’s possible to arrange in both Bash and Vim as well.

Ignoring file types

There are probably certain filetypes in your directories that you’ll never want to edit with Vim. There’s hence no point in making them options for the autocompletion, and you can exclude them by pattern to make searching for the right file a bit quicker. This is done using the wildignore pattern. I use the following settings:

set wildignore+=*.a,*.o
set wildignore+=*.bmp,*.gif,*.ico,*.jpg,*.png
set wildignore+=.DS_Store,.git,.hg,.svn
set wildignore+=*~,*.swp,*.tmp

Compatibility

For the sake of keeping my .vimrc consistent and compatible on both older and newer machines, I like to wrap these options in a conditional block checking that the wildmenu feature is actually available:

" Wildmenu
if has("wildmenu")
    set wildignore+=*.a,*.o
    set wildignore+=*.bmp,*.gif,*.ico,*.jpg,*.png
    set wildignore+=.DS_Store,.git,.hg,.svn
    set wildignore+=*~,*.swp,*.tmp
    set wildmenu
    set wildmode=longest,list
endif

Insert mode

You can also complete file paths and names in insert mode with Ctrl+X Ctrl+F. It can be handy to map this to Tab if you don’t use it for anything else:

inoremap <Tab> <C-X><C-F>

Bash job control

Oftentimes you may wish to start a process on the Bash shell without having to wait for it to actually complete, but still be notified when it does. Similarly, it may be helpful to temporarily stop a task while it’s running without actually quitting it, so that you can do other things with the terminal. For these kinds of tasks, Bash’s built-in job control is very useful.

Backgrounding processes

If you have a process that you expect to take a long time, such as a long cp or scp operation, you can start it in the background of your current shell by adding an ampersand to it as a suffix:

$ cp -r /mnt/bigdir /home &
[1] 2305

This will start the copy operation as a child process of your bash instance, but will return you to the prompt to enter any other commands you might want to run while that’s going.

The output from this command shown above gives both the job number of 1, and the process ID of the new task, 2305. You can view the list of jobs for the current shell with the builtin jobs:

$ jobs
[1]+  Running  cp -r /mnt/bigdir /home &

If the job finishes or otherwise terminates while it’s backgrounded, you should see a message in the terminal the next time you update it with a newline:

[1]+  Done  cp -r /mnt/bigdir /home &

Foregrounding processes

If you want to return a job in the background to the foreground, you can type fg:

$ fg
cp -r /mnt/bigdir /home &

If you have more than one job backgrounded, you should specify the particular job to bring to the foreground with a parameter to fg:

$ fg %1

In this case, for shorthand, you can optionally omit fg and it will work just the same:

$ %1

Suspending processes

To temporarily suspend a process, you can press Ctrl+Z:

$ cp -r /mnt/bigdir /home
^Z
[1]+  Stopped  cp -r /mnt/bigdir /home

You can then continue it in the foreground or background with fg %1 or bg %1 respectively, as above.

This is particularly useful while in a text editor; instead of quitting the editor to get back to a shell, or dropping into a subshell from it, you can suspend it temporarily and return to it with fg once you’re ready.

Dealing with output

While a job is running in the background, it may still print its standard output and standard error streams to your terminal. You can head this off by redirecting both streams to /dev/null for verbose commands:

$ cp -rv /mnt/bigdir /home &>/dev/null

However, if the output of the task is actually of interest to you, this may be a case where you should fire up another terminal emulator, perhaps in GNU Screen or tmux, rather than using simple job control.

Suspending SSH sessions

As a special case, you can suspend an SSH session using an SSH escape sequence. Type a newline followed by a ~ character, and finally press Ctrl+Z to background your SSH session and return to the terminal from which you invoked it.

tom@conan:~$ ssh crom
tom@crom:~$ ~^Z [suspend ssh]
[1]+  Stopped  ssh crom
tom@conan:~$

You can then resume it as you would any job by typing fg:

tom@conan:~$ fg %1
ssh crom
tom@crom:~$

Command line editing

By default, the Bash shell uses GNU Readline, which provides a set of Emacs-friendly key bindings that are a pretty workable way to edit long and complicated commands. If you learn a little about the chords available to you in editing Bash commands through this library, and combine that with a little old-school command-line magic, you can work at high speed with decent accuracy quite easily. Alternatively, if you don’t like the Emacs-style keybindings and would prefer to stick to a vi-friendly model, you can use set -o vi to edit your command line directly with vi keybindings.

However, if you’re building a particularly complex string of commands involving a lot of pipes, escapes, and redirections, it often turns out to be handy to actually load them into your favourite editor, to give you full facility to edit them in any way you wish. Bash provides a method for this in the form of its Ctrl+X, Ctrl+E binding.

To use it, you can type anything at the command prompt (including nothing at all) and press Ctrl+X, Ctrl+E to bring up your EDITOR, be it Vim, Emacs, or Nano, with the contents of the command line there to edit. As soon as you save and quit, the command will be run as stated, and will be entered into the command history as if you typed it out on the shell directly.

There’s also a handy built-in Bash shortcut, fc (short for “fix command”) to open the previous command in your editor, allow you to edit it, and then run it automatically when you quit. This is particularly useful if you’ve made a small mistake in a complex line of shell code.

If this happens to bring up the wrong editor, perhaps because your choice doesn’t match that of the system administrator, you can set your personal preference of editor like so:

$ export EDITOR=/usr/bin/vim

You can confirm this is working by checking your environment variables:

$ env

One downside of this method is that without special setup within your editor, you lose some of the benefits of things like tab completion. Fortunately it only takes a little creative mapping to make this work in Vim, taking advantage of the Ctrl+X, Ctrl+F file completion that’s already built in. You could even bind that straight to the Tab key if you don’t otherwise use it.

:inoremap <Tab> <C-X><C-F>