About Tom Ryder

sysadmin, dev, writer, IRC nuisance. vi/vim/vimself

Vi mode in Bash

Because the Bash shell uses GNU Readline, you’re able to set options in .bashrc and .inputrc to extensively customise how you enter your command lines, including specifying whether you want the default Emacs-like keybindings (e.g. Ctrl+W to erase a word), or bindings using a modal interface familiar to vi users.

To use vi mode in Bash and any other tool that uses GNU Readline, such as the MySQL command line, you need only put this into your .inputrc file, then log out and in again:

set editing-mode vi

If you only want to use this mode in Bash, an alternative is to use the following in your .bashrc, again with a login/logout or resourcing of the file:

set -o vi

You can check this has applied correctly with the following, which will spit out a list of the currently available bindings for a set of fixed possible actions for text:

$ bind -P

The other possible value for editing-mode is emacs. Both options simply change settings in the output of bind -P above.

This done, you should find that you open a command line in insert mode, but when you press Escape or Ctrl+[, you will enter an emulation of Vi’s normal mode. Enter will run the command in its present state while in either mode. The bindings of most use in this mode are the classic keys for moving to positions on a line:

  • ^ — Move to start of line
  • $ — Move to end of line
  • b — Move back a word
  • w — Move forward a word
  • e — Move to the end of the next word

Deleting, yanking, and pasting all work too. Also note that k and j in normal mode allow you to iterate through your history in the same way that Ctrl+P and Ctrl+N do in Emacs mode. Searching with ? and / doesn’t work by default, but the Ctrl+R and Ctrl+S bindings still seem to work.

If you are reasonably used to working with the modeless Emacs for most of your shell work but do occasionally find yourself in a situation where being able to edit a long command line in vi would be handy, you may prefer to press Ctrl+X Ctrl+E to bring up the command line in your $EDITOR instead, affording you the complete power of Vim to edit rather than the somewhat sparse vi emulation provided by Readline. If you want to edit a command you just submitted, the fc (fix command) Bash builtin works too.

The shell is a very different environment for editing text, being inherently interactive and fixed to one line rather than a static multi-line buffer, which leads some otherwise diehard vi users such as myself to prefer the Emacs mode for editing commands. For one thing, vi mode in Bash trips on the vi anti-pattern of putting you in insert mode by default, and at the start of every command line. But if the basic vi commands are etched indelibly into your memory and have become automatic, you may appreciate being able to edit your command line using these keys instead. It’s certainly worth a try at any rate, and I do still occasionally see set -o vi in the .bashrc files of a few of the pros on GitHub.

Arabesque passed 100,000 visits today, having existed little over a month, with over 60,000 unique visitors. Thanks very much to everyone who reads and comments on the articles.
Bash process substitution

For tools like diff that work with multiple files as parameters, it can be useful to work with not just files on the filesystem, but also potentially with the output of arbitrary commands. Say, for example, you wanted to compare the output of ps and ps -e with diff -u. An obvious way to do this is to write files to compare the output:

$ ps > ps.out
$ ps -e > pse.out
$ diff -u ps.out pse.out

This works just fine, but Bash provides a shortcut in the form of process substitution, allowing you to treat the standard output of commands as files. This is done with the <() and >() operators. In our case, we want to direct the standard output of two commands into place as files:

$ diff -u <(ps) <(ps -e)

This is functionally equivalent, except it’s a little tidier because it doesn’t leave files lying around. This is also very handy for elegantly comparing files across servers, using ssh:

$ diff -u .bashrc <(ssh remote cat .bashrc)

Conversely, you can also use the >() operator to direct from a filename context to the standard input of a command. This is handy for setting up in-place filters for things like logs. In the following example, I’m making a call to rsync, specifying that it should make a log of its actions in log.txt, but filter it through grep -vF .tmp first to remove anything matching the fixed string .tmp:

$ rsync -arv --log-file=>(grep -vF .tmp >log.txt) src/ host::dst/

Combined with tee this syntax is a way of simulating multiple filters for a stdout stream, transforming output from a command in as many ways as you see fit:

$ ps -ef | tee >(awk '$1=="tom"' >toms-procs.txt) \
               >(awk '$1=="root"' >roots-procs.txt) \
               >(awk '$1!="httpd"' >not-apache-procs.txt) \
               >(awk 'NR>1{print $1}' >pids-only.txt)

In general, the idea is that wherever on the command line you could specify a file to be read from or written to, you can instead use this syntax to make an implicit named pipe for the text stream.

Thanks to Reddit user Rhomboid for pointing out an incorrect assertion about this syntax necessarily abstracting mkfifo calls, which I’ve since removed.

Automatic tmux titles

If you’re using tmux as a terminal multiplexer and keeping one window open per host, you might be manually renaming each window to feature the relevant hostname. This is a little annoying to do if you’re dealing with a lot of hosts, so it’s worthwhile to automate it.

In the tmux manual, the following escape code incantation is given to update the window title from within the terminal:

$ printf '\033kWINDOW_NAME\033\\'

In much the same way that you can update the title of an xterm-compatible terminal emulator with control codes as part of the $PS1 variable defining the prompt, you can update the title of a tmux window to the current hostname (or any other relevant text) automatically by prefixing this call to the $PROMPT_COMMAND. This is best done in your .bashrc. The below code assumes you are using either screen or screen-256color as your $TERM string in your .tmux.conf:

case "$TERM" in
    screen*)
        PROMPT_COMMAND="printf '\033k$(hostname)\033\\';"${PROMPT_COMMAND}
        ;;
esac

After logging out and in again, this will update the title of the window to the hostname of the current machine just before the prompt is presented, saving you the trouble of updating the window title if like myself you never use it for anything besides the machine’s hostname.

Gracefully degrading .vimrc

If you work on many machines with varying operating systems (Windows, GNU/Linux, MacOS X, BSD) and in various upgrade states, particularly if some of the machines are a lot older or have more minimal or custom installations of Vim, you might not be using your .vimrc file on all of them because it includes features that aren’t available on some other machines, meaning that Vim spits a lot of errors at you on startup.

This might have prompted you to perhaps keep a simpler .vimrc file, a “lesser” .vimrc, that you put onto your remote machines, and you keep the “real” .vimrc on your own machine to include lines that use all of the features only available to you on that machine. If you like to version your configuration files, maintaining and testing both of the .vimrc files on all the machines gets old fast; it would be much better to have a single .vimrc file that simply ignored configuration it didn’t understand. There are several ways to approach this.

Check features

Perhaps the best way to manage this is to group all of your configuration items by Vim feature, and to check for their presence in your .vimrc file before attempting to set any of the relevant options. You can do this with the has() function. As an example, here’s a stanza from my .vimrc:

if has("spell")
    set spelllang=en_nz
    nnoremap <leader>s :set spell!<CR>
endif

I set the spellang option and perform the remapping only if the +spell feature is actually available.

If an option is dependent on a feature having been compiled into Vim, you can usually tell by calling :help on it and looking for a phrase like “not available when compiled without the +xyz feature.” You can also view a list all the features available with :help feature-list, and see which features are compiled into a given vim binary with the --version parameter:

$ vim --version
VIM - Vi IMproved 7.3 (2010 Aug 15, compiled Feb 11 2012 03:54:05) Included patches: 1-429
Modified by pkg-vim-maintainers@lists.alioth.debian.org
Compiled by jamessan@debian.org
Huge version with GTK2 GUI.  Features included (+) or not (-):
+arabic +autocmd +balloon_eval +browse ++builtin_terms +byte_offset +cindent
+clientserver +clipboard +cmdline_compl +cmdline_hist +cmdline_info +comments
+conceal +cryptv +cscope +cursorbind +cursorshape +dialog_con_gui +diff ...

There are certain special features, like +unix, that you can use to check whether the Vim instance running is on a platform suitable for an option or not. I find this is handy for choosing the correct syntax for specifying fonts on Windows:

if has("unix")
    set guifont=Inconsolata\ 14
else
    set guifont=Consolas:h12
endif

Check options

You can check whether an option itself exists rather than a feature with exists():

if exists("&foldenable")
    set foldenable
endif

Check version number

Another way of filtering out options for older versions of Vim is by version number, which you can perform by checking the value of v:version. For example, to only set folding options if you’re working with at least Vim 7, you could do:

if v:version >= 700
    set foldenable
endif

In this particular case, though, it’s a little clearer and more robust to check the condition with if has("folding"), because the version number being recent enough does not necessarily mean the feature exists. However, one good application of using version numbers is fixing bugs or unexpected behaviour in older instances of Vim, to make it behave consistently with newer versions, or even vice-versa if necessary.

Silent calls

If you can’t find a way to filter by feature or version number, a simple way to suppress any error messages from a configuration line is to preface it with silent!. I find this is a nice compact way to call plugin-dependent functions like pathogen#infect(), or custom colorschemes that you can’t be sure actually exist on the machine:

silent! call pathogen#infect()
silent! colorscheme zellner

Try/Catch/If

If you’re not dealing with versions of Vim older than 7.0, another possibility is the try/catch/endtry block. This is handy for setting a default or fallback option if a call fails, such as selecting colorschemes:

try
    colorscheme zenburn
catch
    colorscheme torte
endtry

This is my least-favoured method of making .vimrc files degrade gracefully, as it breaks completely on older instances of Vim.

Thanks to Reddit user bouncingsoul for suggesting the second method which I initially missed.

SSH agents

Public key authentication has a lot of advantages for connecting to servers, particularly if it’s the only allowed means of authentication, reducing the chances of a brute force password attack to zero. However, it doesn’t solve the problem of having to type in a password or passphrase on each connection, unless you’re using a private key with no passphrase, which is quite risky if the private key is compromised.

Thankfully, there’s a nice supplement to a well-secured SSH key setup in the use of agents on trusted boxes to securely store decrypted keys per-session, per-user. Judicious use of an SSH agent program on a trusted machine allows you to connect to any server for which your public key is authorised by typing your passphrase to decrypt your private key only once.

SSH agent setup

The ssh-agent program is designed as a wrapper for a shell. If you have a private and public key setup ready, and you have remote machines for which your key is authorised, you can get an idea of how the agent works by typing:

$ ssh-agent bash

This will prompt you for your passphrase, and once entered, within the context of that subshell, you will be able to connect to authorised remote servers without typing in the passphrase again. Once loaded, you can examine the identities you have by using ssh-add -l to see the fingerprints, and ssh-add -L for the public keys:

$ ssh-agent bash
Enter passphrase for /home/user/.ssh/id_rsa:
Identity added: /home/user/.ssh/id_rsa (/home/user/.ssh/id_rsa)
$ ssh-add -l
2048 07:1e:7d:c4:8a:0e:bc:b0:74:40:71:49:7c:70:9c /home/user/.ssh/id_rsa (RSA)
$ ssh-add -L
ssh-rsa AAAAB3NzaC1yc2EAAAADAQABAAABAQC+WvWXmVPx6UYB/uf+HTh1Y5zEVOmSeFfj6IC0fwN
lELVoFco9qdM4cuh6E6UaDURezjLSiayKt237DFHMgK9Hp4QPgN3ZJ7f7mesH7EHRnpLcvt0Rl3k1I4
C6gConwmkPZj3ax/cr6DAI9v7Ggeo7YPdKYhntB4TCEZfXlfihF5Vh5A2Od8cCNqy5KFKsFaLoI8Gwr
+ZC0CoxIoW6t5t6C/ZNRK2ojVwRWvp3nxcZsOzSdZJu3jcNHGSr0fxpdythRrOjzdDHgCiBuH+7mGKa
tLewbchdj8AgdeCE410xDJkov+tQuGYXZQAOx+JzWgiDI0VzWZsaV2QuyEF4NyG/
/home/user/.ssh/id_rsa

You can set up your .bashrc file to automatically search for accessible SSH agents to use for the credentials for new connections, and to prompt you for a passphrase to open a new one if it need be. There are very workable instructions on GitHub for setting this up.

If you want to shut down the agent at any time, you can use ssh-agent -k.

$ ssh-agent -k
unset SSH_AUTH_SOCK;
unset SSH_AGENT_PID;
echo Agent pid 790 killed;

SSH agent forwarding

Where the configuration of the remote machine allows it, you can forward authentication requests made from the remote machine back to the agent on your workstation. This is handy for working with semi-trusted gateway machines that you trust to forward your authentication requests correctly, but on which you’d prefer not to put your private key.

This means that if you connect to a remote machine from your workstation running an SSH agent with the following, using the -A parameter:

user@workstation:~$ ssh -A remote.example.com

You can then connect to another machine from remote.example.com using your private key on workstation:

user@remote:~$ ssh another.example.com

SSH agent authentication via PAM

It’s also possible to use SSH agent authentication as a PAM method for general authentication, such as for sudo, using pam_ssh_agent_auth.

256 colour terminals

Using 256 colours in terminals is well-supported in GNU/Linux distributions these days, and also in Windows terminal emulators like PuTTY. Using 256 colours is great for Vim colorschemes in particular, but also very useful for Tmux colouring or any other terminal application where a slightly wider colour space might be valuable. Be warned that once you get this going reliably, there’s no going back if you spend a lot of time in the terminal.

Xterm

To set this up for xterm or emulators that use xterm as the default value for $TERM, such as xfce4-terminal or gnome-terminal, it generally suffices to check the options for your terminal emulator to ensure that it will allow 256 colors, and then use the TERM string xterm-256color for it.

An earlier version of this post suggested changing the TERM definition in .bashrc, which is generally not a good idea, even if bounded with conditionals as my example was. You should always set the terminal string in the emulator itself if possible, if you do it at all.

Be aware that older systems may not have terminfo definitions for this terminal, but you can always copy them in using a private .terminfo directory if need be.

Tmux

To use 256 colours in Tmux, you should set the default terminal in .tmux.conf to be screen-256color:

set -g default-terminal "screen-256color"

This will allow you to use color definitions like colour231 in your status lines and other configurations. Again, this particular terminfo definition may not be present on older systems, so you should copy it into ~/.terminfo/s/screen-256color on those systems if you want to use it everywhere.

GNU Screen

Similarly, to use 256 colours in GNU Screen, add the following to your .screenrc:

term screen-256color

Vim

With the applicable options from the above set, you should not need to change anything in Vim to be able to use 256-color colorschemes. If you’re wanting to write or update your own 256-colour compatible scheme, it should either begin with set t_Co=256, or more elegantly, check the value of the corresponding option value is &t_Co is 256 before trying to use any of the extra colour set.

The Vim Tips Wiki contains a detailed reference of the colour codes for schemes in 256-color terminals.

Terminal annoyances

Largely for legacy support reasons, terminal emulators and consoles include a few features that were useful on older terminal systems, but that are not needed or even a hindrance today. Perhaps chief among these is the legacy of flow control characters, referred to in the stty manual as “XON/XOFF flow control”. With this enabled, as it is by default on many systems, pressing Ctrl+S in a terminal will prevent both input and output of characters until terminal writing is resumed again with Ctrl+Q. For people not aware of this feature this can be disconcerting, as the terminal apparently simply freezes and won’t come unstuck; if you’re on an SSH connection you may incorrectly think there’s a network problem.

While this may still have some limited applications, with slow serial terminals more or less a thing of the past it’s mostly just annoying, particularly when using applications that are very heavy on Ctrl chords, and especially when you use GNU Screen or some other terminal multiplexer with Ctrl+A as the prefix key that invites fat-fingering Ctrl+S. You can turn flow control off completely by including this stty call in your .bashrc:

stty -ixon

This also frees these keys up for other uses, such as being bound in Vim or Emacs, or for the forward incremental history search feature in Bash, which I find much more useful.

Similarly annoying is the beep emitted from the PC speaker under some circumstances when using the console, for example when pressing Tab to invoke Bash autocompletion when no further completions are available. I also prefer to turn this off, which can be done with:

setterm -bfreq 0

I don’t find myself missing either feature, though I’m told a few people still find flow control handy in some circumstances. There’s ongoing interest in disabling the feature by default in certain distributions.

Better Bash history

By default, the Bash shell keeps the history of your most recent session in the .bash_history file, and the commands you’ve issued in your current session are also available with a history call. These defaults are useful for keeping track of what you’ve been up to in the shell on any given machine, but with disks much larger and faster than they were when Bash was designed, a little tweaking in your .bashrc file can record history more permanently, consistently, and usefully.

Append history instead of rewriting it

You should start by setting the histappend option, which will mean that when you close a session, your history will be appended to the .bash_history file rather than overwriting what’s in there.

shopt -s histappend

Allow a larger history file

The default maximum number of commands saved into the .bash_history file is a rather meager 500. If you want to keep history further back than a few weeks or so, you may as well bump this up by explicitly setting $HISTSIZE to a much larger number in your .bashrc. We can do the same thing with the $HISTFILESIZE variable.

HISTFILESIZE=1000000
HISTSIZE=1000000

The man page for Bash says that HISTFILESIZE can be unset to stop truncation entirely, but unfortunately this doesn’t work in .bashrc files due to the order in which variables are set; it’s therefore more straightforward to simply set it to a very large number.

If you’re on a machine with resource constraints, it might be a good idea to occasionally archive old .bash_history files to speed up login and reduce memory footprint.

Don’t store specific lines

You can prevent commands that start with a space from going into history by setting $HISTCONTROL to ignorespace. You can also ignore duplicate commands, for example repeated du calls to watch a file grow, by adding ignoredups. There’s a shorthand to set both in ignoreboth.

HISTCONTROL=ignoreboth

You might also want to remove the use of certain commands from your history, whether for privacy or readability reasons. This can be done with the $HISTIGNORE variable. It’s common to use this to exclude ls calls, job control builtins like bg and fg, and calls to history itself:

HISTIGNORE='ls:bg:fg:history'

Record timestamps

If you set $HISTTIMEFORMAT to something useful, Bash will record the timestamp of each command in its history. In this variable you can specify the format in which you want this timestamp displayed when viewed with history. I find the full date and time to be useful, because it can be sorted easily and works well with tools like cut and awk.

HISTTIMEFORMAT='%F %T '

Use one command per line

To make your .bash_history file a little easier to parse, you can force commands that you entered on more than one line to be adjusted to fit on only one with the cmdhist option:

shopt -s cmdhist

Store history immediately

By default, Bash only records a session to the .bash_history file on disk when the session terminates. This means that if you crash or your session terminates improperly, you lose the history up to that point. You can fix this by recording each line of history as you issue it, through the $PROMPT_COMMAND variable:

PROMPT_COMMAND='history -a'

Smarter directory navigation

Shell autocompletion of directory and file names makes navigating through your filesystem quite a bit quicker than if you had to type all of the paths in full, but there are a few other ways to make navigating through and between long pathnames on your filesystem a little bit easier.

cd

As a first note, typing cd with no arguments will take you straight back to your HOME directory; you don’t actually need to type cd ~ or cd $HOME in most cases.

cd ~username

You can move to any particular user’s HOME directory with the general form cd ~username.

cd -

To navigate to the directory you were in before the last cd call, you can use cd -. This will both move you back into that directory and echo the pathname it was on for you.

$ pwd
/home/tom
$ cd projects
$ pwd
/home/tom/projects
$ cd -
/home/tom

pushd/popd

If you are working mostly within one directory and need to change to another briefly for some reason, rather than using cd you can use pushd to move to that directory and add it onto the directory stack. You can move to further directories with pushd successively, and then when you’re done in each one, popd will take you a step backward again. Each time you call pushd or popd, it will print the current contents of the directory stack:

$ pushd projects
~/projects ~
$ pushd /usr/local/bin
/usr/local/bin ~/projects ~
$ popd
~/projects ~
$ popd
~

CDPATH

By default, you can move around relatively in the filesystem tree by typing cd dir for any subdirectory of your working directory, rather than its full path. You can generalise this to provide a list of directories to check successively for matching subdirectories:

$ export CDPATH=.:~

In this case, if I were to type cd projects, if there were no subdirectory of the working directory by the name of project but there was one called /home/tom/project, I would be sent there instead. This probably isn’t a good thing to set in any non-interactive terminal, but it can be a nice shortcut for interactive shells. Note that the first part of the list should always be ., for the working directory.

This has the side effect of printing the complete path to which you just moved on a line before your prompt if it’s used. I happen to find this quite helpful.

Tolerate typos

In an interactive shell, if you make a small mistake in typing a path for cd that means it doesn’t resolve to an actual directory, it’s generally safe to have the shell correct mistakes for you and move you into the directory you most likely intended:

shopt -s cdspell

This will correct things like dropped or swapped characters in the path you typed:

$ cd /home/tmo
/home/tom

Variables

If you know you’re going to be switching back and forth between several directories, it often makes sense to put them into variables for quick changing, or even just editing files directly without having to move around at all:

$ acnf=/usr/local/apache/conf
$ abin=/usr/local/apache/bin
$ sanc=/var/www/sanctum
$ vim "$acnd"/httpd.conf
$ vim "$sanc"/index.html
$ cd "$abin"
$ ./apachectl configtest
$ ./apachectl restart

This last one may seem like a very elementary trick, or something that you’d typically only do within a shell script. However, if you use consistent variable names or even put them into a startup file like .bashrc, it’s actually quite surprising how much time it can save you; you start to realise how much time you were spending typing out paths.

Watching with tmux

watch is one of those Unix tools which does something very simple, but combined with other tools has a myriad of uses. While there are a few useful features or switches for watch, its central concept is simple; it runs something for you repeatedly, and shows the output on the screen.

The reason this becomes so useful in a system administration context is that when used with a terminal multiplexer, watch can be used to track the progress of any particular task, or to monitor system resources, as you work and change things. Some examples of simple but useful monitoring tasks are:

  • Load averagewatch uptime
  • Disk spacewatch df -h
  • Process countwatch 'ps -ef | wc -l'
  • Memory usagewatch free -m
  • Size of a volatile filewatch du -sh filename.sh

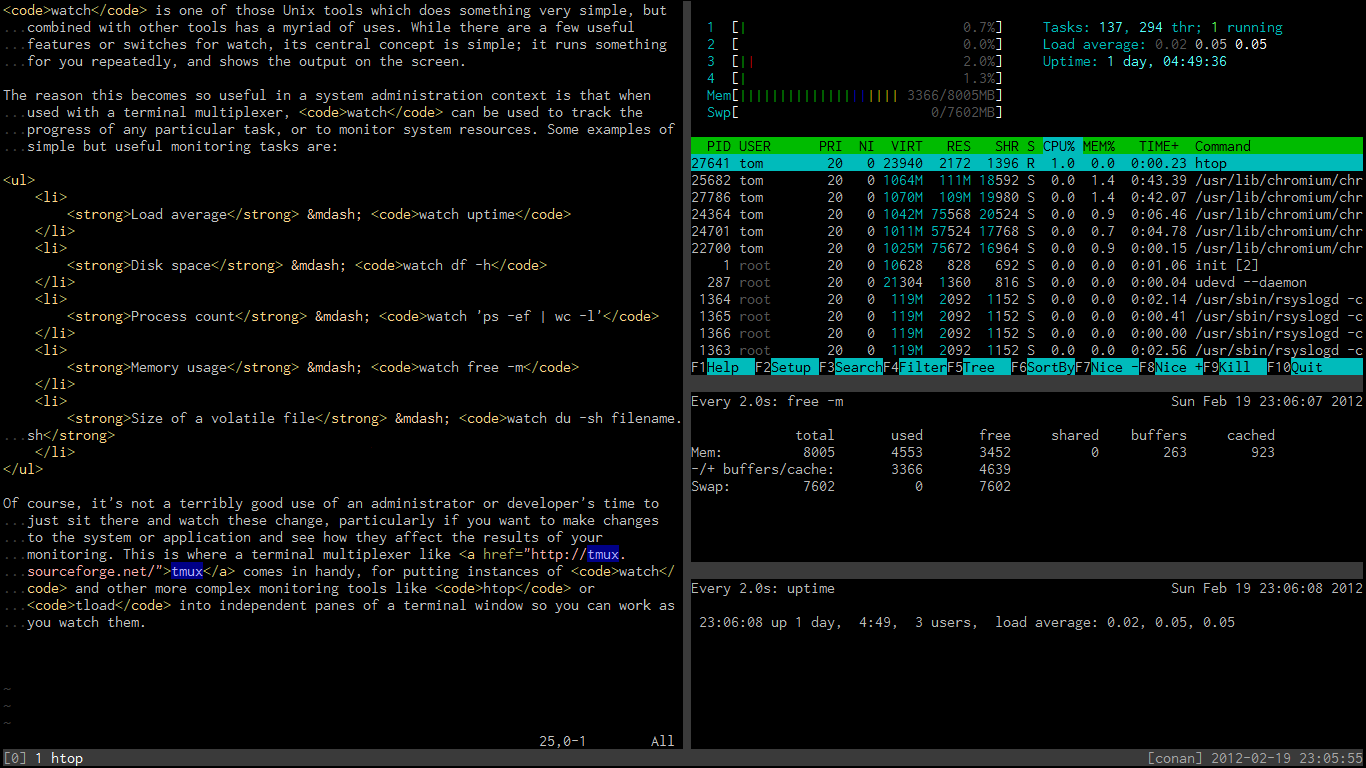
Of course, it’s not a terribly good use of an administrator or developer’s time to just sit there and watch these change, particularly if you want to make changes to the system or application and see how they affect the results of your monitoring. This is where a terminal multiplexer like tmux comes in handy, for putting instances of watch and other more complex monitoring tools like htop or tload into independent panes of a terminal window so you can work as you watch them.

Monitoring tasks running in tmux

Monitoring tasks running in tmux

You can set these windows up using the usual key combinations, but if you have a long string of text or a known command that you want to start running in another window, it’s often easier to call the relevant tmux commands directly from the shell:

$ watch uptime
$ tmux split-window -dh "!!"

This will split the window into two parts, and run watch uptime in the new one, while leaving your cursor in the original window.

If you find yourself doing this often, you could make it into a shell function in your .bashrc or similar:

function tmw {
    tmux split-window -dh "$*"
}

You can then quickly run things like the following, as a kind of general method to background a monitoring or long-running task quickly:

$ tmw watch uptime
$ tmw htop
$ tmw rsync -arvz source::mnt/location /home/tom/destination

Thanks to user WishCow for pointing out an error in the comments.